Панель навигации Android на верхней панели быстрого доступа
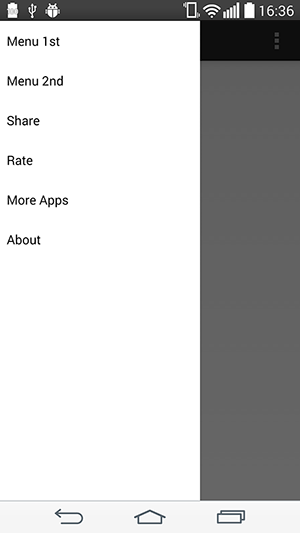
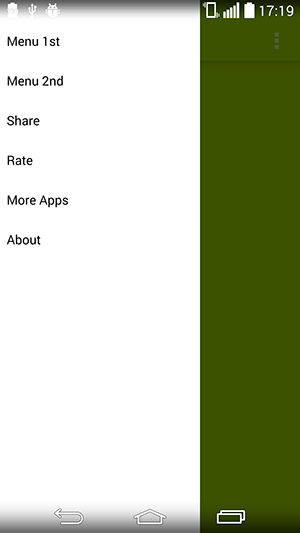
Я пытаюсь сделать навигационный ящик над панелью действий, когда он был сдвинут вправо, как это приложение:
[Удалено]
это макет моей основной деятельности:
<?xml version="1.0" encoding="utf-8"?>

<android.support.v4.widget.DrawerLayout ...>

    <RelativeLayout android:orientation="vertical"

        android:layout_width="fill_parent"

        android:layout_height="fill_parent">

        ...

    </RelativeLayout>

    <fragment android:name="com...."

        android:layout_gravity="start"

        android:id="@id/navigation"

        android:layout_width="@dimen/navigation_menu_width"

        android:layout_height="fill_parent" />

</android.support.v4.widget.DrawerLayout>
некоторые другие вопросы по stackoverflow похожи на этот вопрос, но все ответы рекомендуют использовать sliding menu lib. Но это приложение они по-прежнему используют android.поддержка.v4.штучка.Ничья-и они добиваются успеха. Не спрашивайте меня, как я знаю, что они используют стандартный навигационный ящик, но я уверен об этом.
буду очень признателен за вашу помощь.
ВОТ ОКОНЧАТЕЛЬНОЕ РЕШЕНИЕ: большое спасибо @Peter Cai ЭТО РАБОТАЕТ ОТЛИЧНО.
https://github.com/lemycanh/DrawerOnTopActionBar
4 ответов:
у меня есть крошечный "трюк" узнал от https://github.com/jfeinstein10/SlidingMenu для реализации требуемого эффекта.
вам нужно только удалить первый дочерний элемент декора окна и добавить первый дочерний элемент в представление содержимого вашего ящика. После этого вам нужно только добавить свой ящик в вид декора окна.
Ниже приведены некоторые инструкции для вас, чтобы сделать это.
во-первых, создайте xml с именем "декор.xml " или все, что вам нравится. Только положите DrawerLayout и ящик внутри. "FrameLayout" ниже-это просто контейнер. Мы будем использовать его, чтобы обернуть содержание вашей деятельности.
<?xml version="1.0" encoding="utf-8"?>
<android.support.v4.widget.DrawerLayout ...>
    <FrameLayout android:id="@+id/container"
        android:orientation="vertical"
        android:layout_width="fill_parent"
        android:layout_height="fill_parent"/>
    <fragment android:name="com...."
        android:layout_gravity="start"
        android:id="@id/navigation"
        android:layout_width="@dimen/navigation_menu_width"
        android:layout_height="fill_parent" />
</android.support.v4.widget.DrawerLayout>
а затем удалите DrawerLayout в вашем основном макете. Теперь макет вашей основной деятельности должен выглядеть так
<RelativeLayout android:orientation="vertical"
    android:layout_width="fill_parent"
    android:layout_height="fill_parent">
    ...
</RelativeLayout>
мы предполагаем, что макет основного вида деятельности называется " main.XML."
в вашем MainActivity, напишите как следующее:
@Override
protected void onCreate(Bundle savedInstanceState) {
    super.onCreate(savedInstanceState);
    setContentView(R.layout.main);

    // Inflate the "decor.xml"
    LayoutInflater inflater = (LayoutInflater) getSystemService(Context.LAYOUT_INFLATER_SERVICE);
    DrawerLayout drawer = (DrawerLayout) inflater.inflate(R.layout.decor, null); // "null" is important.

    // HACK: "steal" the first child of decor view
    ViewGroup decor = (ViewGroup) getWindow().getDecorView();
    View child = decor.getChildAt(0);
    decor.removeView(child);
    FrameLayout container = (FrameLayout) drawer.findViewById(R.id.container); // This is the container we defined just now.
    container.addView(child);

    // Make the drawer replace the first child
    decor.addView(drawer);

    // Do what you want to do.......

}
Теперь у вас есть DrawerLayout, который может скользить над панелью действий. Но вы можете найти его в строке состояния. Возможно, вам придется добавить paddingTop в ящик, чтобы исправить это.
обновление: как наложить панель действий с навигационным ящиком. (С помощью новой панели инструментов) Используйте их в своих зависимостях в своей сборке.gradle
compile 'com.android.support:appcompat-v7:21.0.0'
compile 'com.android.support:support-v4:21.0.0'
Это как ваш drawerlayout
<!-- A DrawerLayout is intended to be used as the top-level content view using match_parent for both width and height to consume the full space available. -->
<android.support.v4.widget.DrawerLayout
    xmlns:android="http://schemas.android.com/apk/res/android"
    xmlns:tools="http://schemas.android.com/tools"
    android:id="@+id/drawer_layout"
    android:layout_width="match_parent"
    android:layout_height="match_parent">
    <LinearLayout
        android:id="@+id/layout_main"
        android:layout_width="match_parent"
        android:layout_height="match_parent"
        android:orientation="vertical">
    <include layout="@layout/toolbar"/>
    <!-- As the main content view, the view below consumes the entire
         space available using match_parent in both dimensions. -->
    <FrameLayout
        android:id="@+id/content_frame"
        android:layout_width="match_parent"
        android:layout_height="match_parent"
        android:background="@color/white"/>

    </LinearLayout>
    <fragment android:id="@+id/navigation_drawer"
        android:layout_width="@dimen/navigation_drawer_width"
        android:layout_height="match_parent"
        android:layout_gravity="start"
        android:background="@color/list_background"
         />

</android.support.v4.widget.DrawerLayout>
создать новую панель инструментов.xml-файл в папке макета.
<?xml version="1.0" encoding="utf-8"?>
<android.support.v7.widget.Toolbar
    xmlns:android="http://schemas.android.com/apk/res/android"
    xmlns:app="http://schemas.android.com/apk/res-auto"
    android:id="@+id/toolbar"
    android:layout_height="wrap_content"
    android:layout_width="match_parent"
    app:theme="@style/ThemeOverlay.AppCompat.Dark.ActionBar"
    app:popupTheme="@style/ThemeOverlay.AppCompat.Light"
    android:minHeight="?attr/actionBarSize"
    android:background="?attr/colorPrimary" />
перейти к вам деятельности, которые расширяют навигационный ящик. и добавьте это после SetContentView ()
Toolbar toolbar = (Toolbar) findViewById(R.id.toolbar);
setSupportActionBar(toolbar);
Не забудьте расширить тему NoActionBar в ваших значениях папка.
<style name="Theme.Whtsnxt" parent="@style/Theme.AppCompat.Light.NoActionBar">
    <item name="windowActionBar">false</item>
    <!-- colorPrimary is used for the default action bar background -->
    <item name="windowActionModeOverlay">true</item>
    <item name="android:textColorPrimary">@color/white</item>
    <item name="colorPrimary">@color/splashscreen</item>
    <item name="colorPrimaryDark">@color/holo_blue_light</item>

    <item name="android:windowBackground">@color/white</item>
    <item name="android:colorBackground">@color/white</item>

</style>
Я опубликовал трюк,который делает это возможным в предыдущих версиях Android L. Вы можете найти мое решение в этой статье. Надеюсь, что это может быть полезно кому-то.
Если вы не хотите использовать lib или этот хак:
- Расширить "Тему.Совместимости приложений.NoActionBar"
- переместите первый элемент вашего DrawerLayout в LinearLayout.
добавьте панель инструментов в этот LinearLayout.
<android.support.v7.widget.Toolbar
    android:id="@+id/toolbar"
    android:minHeight="?attr/actionBarSize"
    android:layout_width="match_parent"
    android:layout_height="wrap_content"
    app:titleTextColor="@android:color/white"
    android:background="?attr/colorPrimary">
</android.support.v7.widget.Toolbar>
в Activity добавить следующую строку после setContentView
setSupportActionBar((Toolbar) findViewById(R.id.toolbar));- теперь это должно работать.
Comments