13 ответов:
используйте приведенный ниже код пользовательского тоста. Это может вам помочь.
тосты.xml
<LinearLayout xmlns:android="http://schemas.android.com/apk/res/android"
    android:id="@+id/toast_layout_root"
    android:orientation="horizontal"
    android:layout_width="fill_parent"
    android:layout_height="fill_parent"
    android:padding="10dp"
    android:background="#DAAA" >

    <ImageView android:id="@+id/image"
        android:layout_width="wrap_content"
        android:layout_height="fill_parent"
        android:layout_marginRight="10dp" />

    <TextView android:id="@+id/text"
        android:layout_width="wrap_content"
        android:layout_height="fill_parent"
        android:textColor="#FFF" />

</LinearLayout>
MainActivity.java
LayoutInflater inflater = getLayoutInflater();
View layout = inflater.inflate(R.layout.toast_layout,
                               (ViewGroup) findViewById(R.id.toast_layout_root));

ImageView image = (ImageView) layout.findViewById(R.id.image);
image.setImageResource(R.drawable.android);
TextView text = (TextView) layout.findViewById(R.id.text);
text.setText("Hello! This is a custom toast!");

Toast toast = new Toast(getApplicationContext());
toast.setGravity(Gravity.CENTER_VERTICAL, 0, 0);
toast.setDuration(Toast.LENGTH_LONG);
toast.setView(layout);
toast.show();
и проверьте приведенные ниже ссылки также для пользовательского тоста.
пользовательский тост с аналоговыми часами
YouTube: создание пользовательских тостов с помощью кнопки в Android Studio
тост предназначен для показа сообщений в течение коротких промежутков времени; поэтому, как я понимаю, вы хотели бы настроить его с добавлением изображения к нему и изменением размера, цвета текста сообщения. Если это все, что вы хотите сделать, то нет необходимости создавать отдельный макет и раздувать его до экземпляра Toast.
вид тоста по умолчанию содержит
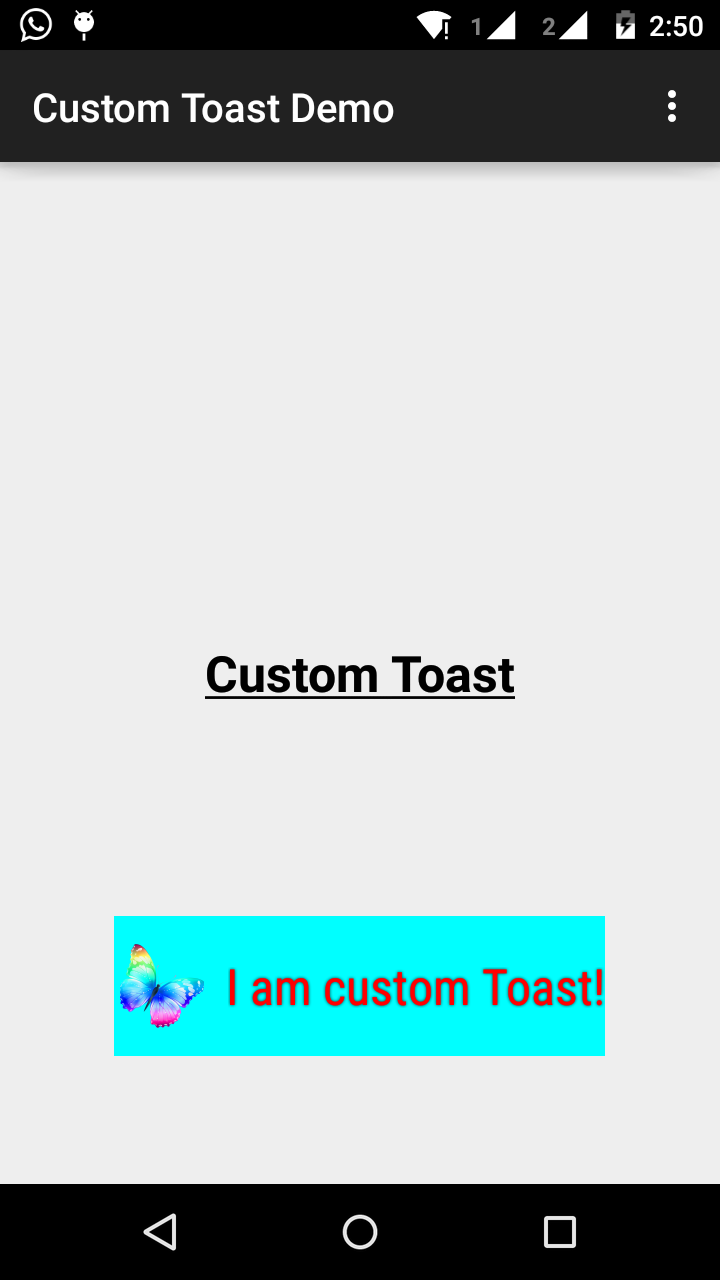
TextViewдля отображения сообщений на нем. Итак, если у нас есть ссылка на идентификатор ресурса этогоTextView, мы можем играть с ним. Так ниже то, что вы можете сделать, чтобы достичь этого:Toast toast = Toast.makeText(this, "I am custom Toast!", Toast.LENGTH_LONG); View toastView = toast.getView(); // This'll return the default View of the Toast. /* And now you can get the TextView of the default View of the Toast. */ TextView toastMessage = (TextView) toastView.findViewById(android.R.id.message); toastMessage.setTextSize(25); toastMessage.setTextColor(Color.RED); toastMessage.setCompoundDrawablesWithIntrinsicBounds(R.mipmap.ic_fly, 0, 0, 0); toastMessage.setGravity(Gravity.CENTER); toastMessage.setCompoundDrawablePadding(16); toastView.setBackgroundColor(Color.CYAN); toast.show();в приведенном выше коде вы можете видеть, что вы можете добавить изображение в TextView через
setCompoundDrawablesWithIntrinsicBounds(int left, int top, int right, int bottom)в зависимости от позиции относительно TextView вы хотите.выход:
Шаг 1:
сначала создайте макет для пользовательского тоста в
res/layout/custom_toast.xml:<?xml version="1.0" encoding="utf-8"?> <LinearLayout xmlns:android="http://schemas.android.com/apk/res/android" android:id="@+id/custom_toast_layout_id" android:layout_width="fill_parent" android:layout_height="fill_parent" android:background="#FFF" android:orientation="horizontal" android:padding="5dp" > <TextView android:id="@+id/text" android:layout_width="wrap_content" android:layout_height="fill_parent" android:textColor="#000" /> </LinearLayout>Шаг 2: в коде действия, получить выше пользовательский вид и прикрепить к тосту:
// Get your custom_toast.xml ayout
LayoutInflater inflater = getLayoutInflater();

View layout = inflater.inflate(R.layout.custom_toast,
(ViewGroup) findViewById(R.id.custom_toast_layout_id));

// set a message
TextView text = (TextView) layout.findViewById(R.id.text);
text.setText("Button is clicked!");

// Toast...
Toast toast = new Toast(getApplicationContext());
toast.setGravity(Gravity.CENTER_VERTICAL, 0, 0);
toast.setDuration(Toast.LENGTH_LONG);
toast.setView(layout);
toast.show();
для получения дополнительной помощи см., Как мы создаем пользовательский Тост В Android:
http://developer.android.com/guide/topics/ui/notifiers/toasts.html
ссылка здесь. Вы найдете свое решение. И попробуй:
создание пользовательского вида тостов
Если простого текстового сообщения недостаточно, вы можете создать индивидуальный макет для вашего всплывающего уведомления. Чтобы создать пользовательский макет, определите макет представления в XML или в коде приложения и передайте корневой объект представления методу setView (View).
например, вы можете создать макет для тостов видны на скриншоте справа следующий XML (сохраненный как toast_layout.xml):
<LinearLayout xmlns:android="http://schemas.android.com/apk/res/android"
            android:id="@+id/toast_layout_root"
            android:orientation="horizontal"
            android:layout_width="fill_parent"
            android:layout_height="fill_parent"
            android:padding="10dp"
            android:background="#DAAA"
>

    <ImageView android:id="@+id/image"
               android:layout_width="wrap_content"
               android:layout_height="fill_parent"
               android:layout_marginRight="10dp"
    />

    <TextView android:id="@+id/text"
              android:layout_width="wrap_content"
              android:layout_height="fill_parent"
              android:textColor="#FFF"
    />
</LinearLayout>
обратите внимание, что идентификатор элемента LinearLayout - "toast_layout". Вы должны использовать этот идентификатор для раздувания макета из XML, как показано здесь:
 LayoutInflater inflater = getLayoutInflater();
 View layout = inflater.inflate(R.layout.toast_layout,
                                (ViewGroup) findViewById(R.id.toast_layout_root));

 ImageView image = (ImageView) layout.findViewById(R.id.image);
 image.setImageResource(R.drawable.android);
 TextView text = (TextView) layout.findViewById(R.id.text);
 text.setText("Hello! This is a custom toast!");

 Toast toast = new Toast(getApplicationContext());
 toast.setGravity(Gravity.CENTER_VERTICAL, 0, 0);
 toast.setDuration(Toast.LENGTH_LONG);
 toast.setView(layout);
 toast.show();
сначала извлеките LayoutInflater с помощью getLayoutInflater () (или getSystemService ()), а затем раздуйте макет из XML с помощью inflate (int, ViewGroup). Первый параметр-это идентификатор ресурса макета, а второй-корневое представление. Вы можете использовать это надутое макет чтобы найти больше объектов представления в макете, теперь захватите и определите содержимое для элементов ImageView и TextView. Наконец, создайте новый тост с тостом (контекстом) и установите некоторые свойства тоста, такие как сила тяжести и продолжительность. Затем вызовите setView (View) и передайте ему надутый макет. Теперь вы можете отобразить тост с вашим пользовательским макетом, вызвав show().
Примечание: не используйте открытый конструктор для тоста, если вы не собираетесь определить макет с помощью setView(посмотреть). Если у вас нет пользовательского макета для использования, вы должны использовать makeText(Context, int, int) для создания тостов.
это то, что я использовал
AllMethodsInOne.java
public static Toast displayCustomToast(FragmentActivity mAct, String toastText, String toastLength, String succTypeColor) {

    final Toast toast;

    if (toastLength.equals("short")) {
        toast = Toast.makeText(mAct, tText, Toast.LENGTH_SHORT);
    } else {
        toast = Toast.makeText(mAct, tText, Toast.LENGTH_LONG);
    }

    View tView = toast.getView();
    tView.setBackgroundColor(Color.parseColor("#053a4d"));
    TextView mText = (TextView) tView.findViewById(android.R.id.message);

    mText.setTypeface(applyFont(mAct));
    mText.setShadowLayer(0, 0, 0, 0);

    tView.setOnClickListener(new View.OnClickListener() {

        @Override
        public void onClick(View v) {
            toast.cancel();
        }
    });
    tView.invalidate();
    if (succTypeColor.equals("red")) {
        mText.setTextColor(Color.parseColor("#debe33"));
        tView.setBackground(mAct.getResources().getDrawable(R.drawable.toast_rounded_red));
        // this is to show error message
    }
    if (succTypeColor.equals("green")) {
        mText.setTextColor(Color.parseColor("#053a4d"));
        tView.setBackground(mAct.getResources().getDrawable(R.drawable.toast_rounded_green));
        // this is to show success message
    }


    return toast;
}
ваш файл.java
при вызове просто напишите ниже.
AllMethodsInOne.displayCustomToast(act, "This is custom toast", "long", "red").show();
Я думаю, что большинство XML-примеров customtoast во всем интернете основаны на одном и том же источнике.
документация для Android, которая, на мой взгляд, очень устарела. fill_parent больше не должен использоваться. Я предпочитаю использовать wrap_content в качестве параметров в сочетании с XML-файле.9.формат PNG. Таким образом, вы можете определить минимальный размер toastbackground по всему размеру предоставленного источника.
Если требуются более сложные тосты, вместо них следует использовать рамку или относительный макет LL.
тосты.xml
<?xml version="1.0" encoding="utf-8"?>
<LinearLayout xmlns:android="http://schemas.android.com/apk/res/android"
    android:id="@+id/points_layout"
    android:orientation="horizontal"
    android:layout_width="wrap_content"
    android:layout_height="wrap_content"
    android:background="@drawable/background"
    android:layout_gravity="center"
    android:gravity="center" >

 <TextView
    android:id="@+id/points_text"
    android:layout_width="wrap_content"
    android:layout_height="wrap_content"
    android:layout_gravity="center"
    android:gravity="center"
    android:layout_margin="15dp"
    android:text="@+string/points_text"
    android:textColor="@color/Green" />

</LinearLayout>
фон.xml
<?xml version="1.0" encoding="utf-8"?>
<nine-patch
   xmlns:android="http://schemas.android.com/apk/res/android"
   android:src="@drawable/background_96"
   android:dither="true"/>
background_96 является background_96.9.формат PNG.
это не проверено очень хорошо, и подсказки ценятся :)
вы можете скачать код здесь.
Шаг 1:
<?xml version="1.0" encoding="utf-8"?>
<RelativeLayout xmlns:android="http://schemas.android.com/apk/res/android"
    xmlns:tools="http://schemas.android.com/tools"
    android:layout_width="match_parent"
    android:layout_height="match_parent"
    android:paddingBottom="@dimen/activity_vertical_margin"
    android:paddingLeft="@dimen/activity_horizontal_margin"
    android:paddingRight="@dimen/activity_horizontal_margin"
    android:paddingTop="@dimen/activity_vertical_margin"
    tools:context=".MainActivity">

    <Button
        android:id="@+id/btnCustomToast"
        android:layout_width="wrap_content"
        android:layout_height="wrap_content"
        android:text="Show Custom Toast" />
  </RelativeLayout>
Шаг 2:
<?xml version="1.0" encoding="utf-8"?>
<LinearLayout xmlns:android="http://schemas.android.com/apk/res/android"
    android:orientation="horizontal"
    android:gravity="center"
    android:layout_width="match_parent"
    android:layout_height="wrap_content">

        <ImageView
            android:id="@+id/custom_toast_image"
            android:layout_width="wrap_content"
            android:layout_height="wrap_content"
            android:src="@mipmap/ic_launcher"/>

        <TextView
            android:id="@+id/custom_toast_message"
            android:layout_width="wrap_content"
            android:layout_height="wrap_content"
            android:text="My custom Toast Example Text" />

</LinearLayout>
Шаг 3:
import android.support.v7.app.AppCompatActivity;
import android.os.Bundle;
import android.view.Gravity;
import android.view.LayoutInflater;
import android.view.View;
import android.view.ViewGroup;
import android.widget.Button;
import android.widget.Toast;

public class MainActivity extends AppCompatActivity {


    private Button btnCustomToast;

    @Override
    protected void onCreate(Bundle savedInstanceState) {
        super.onCreate(savedInstanceState);
        setContentView(R.layout.activity_main);
        btnCustomToast= (Button) findViewById(R.id.btnCustomToast);
        btnCustomToast.setOnClickListener(new View.OnClickListener() {
            @Override
            public void onClick(View v) {

                // Find custom toast example layout file
                View layoutValue = LayoutInflater.from(MainActivity.this).inflate(R.layout.android_custom_toast_example, null);
                // Creating the Toast object
                Toast toast = new Toast(getApplicationContext());
                toast.setDuration(Toast.LENGTH_SHORT);

                // gravity, xOffset, yOffset
                toast.setGravity(Gravity.CENTER_VERTICAL, 0, 0);
                toast.setView(layoutValue);//setting the view of custom toast layout
                toast.show();
            }
        });
    }
}
код для MainActivity.Java-файл.
package com.android_examples.com.toastbackgroundcolorchange;

import android.app.Activity;
import android.os.Bundle;
import android.view.View;
import android.widget.Button;
import android.widget.Toast;
public class MainActivity extends Activity {

 Button BT;
 @Override
 protected void onCreate(Bundle savedInstanceState) {
 super.onCreate(savedInstanceState);
 setContentView(R.layout.activity_main);

 BT = (Button)findViewById(R.id.button1);
 BT.setOnClickListener(new View.OnClickListener() {

 @Override
 public void onClick(View v) {

 Toast ToastMessage = Toast.makeText(getApplicationContext(),"Change Toast Background color",Toast.LENGTH_SHORT);
 View toastView = ToastMessage.getView();
 toastView.setBackgroundResource(R.layout.toast_background_color);
 ToastMessage.show();

 }
 });
 }
}
код для activity_main.xml-файл макета.
<RelativeLayout xmlns:android="http://schemas.android.com/apk/res/android"
 xmlns:tools="http://schemas.android.com/tools"
 android:layout_width="match_parent"
 android:layout_height="match_parent"
 android:paddingBottom="@dimen/activity_vertical_margin"
 android:paddingLeft="@dimen/activity_horizontal_margin"
 android:paddingRight="@dimen/activity_horizontal_margin"
 android:paddingTop="@dimen/activity_vertical_margin"
 tools:context="com.android_examples.com.toastbackgroundcolorchange.MainActivity" >

 <Button
 android:id="@+id/button1"
 android:layout_width="wrap_content"
 android:layout_height="wrap_content"
 android:layout_centerHorizontal="true"
 android:layout_centerVertical="true"
 android:text="CLICK HERE TO SHOW TOAST MESSAGE WITH DIFFERENT BACKGROUND COLOR INCLUDING BORDER" />

</RelativeLayout>
код для toast_background_color.xml-файл макета, созданный в папке res->layout.
<?xml version="1.0" encoding="utf-8"?>
<shape xmlns:android="http://schemas.android.com/apk/res/android" >

 <stroke
    android:width="3dp"
    android:color="#ffffff" ></stroke>
<padding android:left="20dp" android:top="20dp"
    android:right="20dp" android:bottom="20dp" />
<corners android:radius="10dp" />
<gradient android:startColor="#ff000f"
    android:endColor="#ff0000"
    android:angle="-90"/>

</shape>
пользовательский макет для тостов,
custom_toast.xml:<LinearLayout xmlns:android="http://schemas.android.com/apk/res/android" android:orientation="vertical" android:layout_width="match_parent" android:layout_height="match_parent"> <TextView android:layout_width="match_parent" android:layout_height="wrap_content" android:text="Custom Toast" android:gravity="center" android:id="@+id/custom_toast_text" android:typeface="serif" android:textStyle="bold" /> </LinearLayout>и метод Java (просто передайте сообщение toast этому методу):
public void toast(String message)
{
    Toast toast = new Toast(context);
    View view = LayoutInflater.from(context).inflate(R.layout.image_custom, null);
    TextView textView = (TextView) view.findViewById(R.id.custom_toast_text);
    textView.setText(message);
    toast.setView(view);
    toast.setGravity(Gravity.BOTTOM|Gravity.CENTER, 0, 0);
    toast.setDuration(Toast.LENGTH_LONG);
    toast.show();
}
/ / пользовательский класс тостов, где вы можете показать пользовательский или стандартный тост по желанию)
public class ToastMessage {
    private Context context;
    private static ToastMessage instance;

    /**
     * @param context
     */
    private ToastMessage(Context context) {
        this.context = context;
    }

    /**
     * @param context
     * @return
     */
    public synchronized static ToastMessage getInstance(Context context) {
        if (instance == null) {
            instance = new ToastMessage(context);
        }
        return instance;
    }

    /**
     * @param message
     */
    public void showLongMessage(String message) {
        Toast.makeText(context, message, Toast.LENGTH_SHORT).show();
    }

    /**
     * @param message
     */
    public void showSmallMessage(String message) {
        Toast.makeText(context, message, Toast.LENGTH_LONG).show();
    }

    /**
     * The Toast displayed via this method will display it for short period of time
     *
     * @param message
     */
    public void showLongCustomToast(String message) {
        LayoutInflater inflater = ((Activity) context).getLayoutInflater();
        View layout = inflater.inflate(R.layout.layout_custom_toast, (ViewGroup) ((Activity) context).findViewById(R.id.ll_toast));
        TextView msgTv = (TextView) layout.findViewById(R.id.tv_msg);
        msgTv.setText(message);
        Toast toast = new Toast(context);
        toast.setGravity(Gravity.FILL_HORIZONTAL | Gravity.BOTTOM, 0, 0);
        toast.setDuration(Toast.LENGTH_LONG);
        toast.setView(layout);
        toast.show();


    }

    /**
     * The toast displayed by this class will display it for long period of time
     *
     * @param message
     */
    public void showSmallCustomToast(String message) {

        LayoutInflater inflater = ((Activity) context).getLayoutInflater();
        View layout = inflater.inflate(R.layout.layout_custom_toast, (ViewGroup) ((Activity) context).findViewById(R.id.ll_toast));
        TextView msgTv = (TextView) layout.findViewById(R.id.tv_msg);
        msgTv.setText(message);
        Toast toast = new Toast(context);
        toast.setGravity(Gravity.FILL_HORIZONTAL | Gravity.BOTTOM, 0, 0);
        toast.setDuration(Toast.LENGTH_SHORT);
        toast.setView(layout);
        toast.show();
    }

}
простой способ настроить тост,
private void MsgDisplay(String Msg, int Size, int Grav){
    Toast toast = Toast.makeText(this, Msg, Toast.LENGTH_LONG);
    TextView v = (TextView) toast.getView().findViewById(android.R.id.message);
    v.setTextColor(Color.rgb(241, 196, 15));
    v.setTextSize(Size);
    v.setGravity(Gravity.CENTER);
    v.setShadowLayer(1.5f, -1, 1, Color.BLACK);
    if(Grav == 1){
        toast.setGravity(Gravity.BOTTOM, 0, 120);
    }else{
        toast.setGravity(Gravity.BOTTOM, 0, 10);
    }
    toast.show();
}
чтобы избежать проблем с layout_* параметры не используются должным образом, необходимо убедиться, что при раздувании пользовательского макета, что вы указываете правильный ViewGroup в качестве родителя.
многие примеры передают здесь null, но вместо этого вы можете передать существующую группу просмотра тостов в качестве своего родителя.
val toast = Toast.makeText(this, "", Toast.LENGTH_LONG)
val layout = LayoutInflater.from(this).inflate(R.layout.view_custom_toast, toast.view.parent as? ViewGroup?)
toast.view = layout
toast.show()
здесь мы заменяем существующее представление тоста нашим пользовательским представлением. После того, как у вас есть ссылка на ваш макет "макет", вы можете обновить любые изображения / текстовые представления, которые он может содержать.
Это решение также предотвращает любые сбои "вид не прикреплен к оконному менеджеру" от использования null в качестве родителя.
кроме того, избегайте использования ConstraintLayout в качестве корня пользовательского макета, это, похоже, не работает при использовании внутри тоста.
val inflater = layoutInflater val container: ViewGroup = findViewById(R.id.custom_toast_container) val layout: ViewGroup = inflater.inflate(R.layout.custom_toast, container) val text: TextView = layout.findViewById(R.id.text) text.text = "This is a custom toast" with (Toast(applicationContext)) { setGravity(Gravity.CENTER_VERTICAL, 0, 0) duration = Toast.LENGTH_LONG view = layout show() } <LinearLayout xmlns:android="http://schemas.android.com/apk/res/android" android:id="@+id/custom_toast_container" android:orientation="horizontal" android:layout_width="fill_parent" android:layout_height="fill_parent" android:padding="8dp" android:background="#DAAA" > <ImageView android:src="@drawable/droid" android:layout_width="wrap_content" android:layout_height="wrap_content" android:layout_marginRight="8dp" /> <TextView android:id="@+id/text" android:layout_width="wrap_content" android:layout_height="wrap_content" android:textColor="#FFF" /> </LinearLayout>Ссылка:https://developer.android.com/guide/topics/ui/notifiers/toasts
Comments