Нарисуйте пунктиром (не пунктиром!) линия, с IBDesignable в 2017 году
легко нарисовать накатал линия с UIKit. Итак:
CGFloat dashes[] = {4, 2};

[path setLineDash:dashes count:2 phase:0];

[path stroke];

есть ли способ нарисовать настоящую пунктирную линию?

какие идеи?
так как этот вопрос действительно старый и никто не поставил в полный @IBDesignable решение, вот оно...
надеюсь, что это спасет кого-то набрав.
@IBDesignable class DottedVertical: UIView {


    @IBInspectable var dotColor: UIColor = UIColor.etc

    @IBInspectable var lowerHalfOnly: Bool = false


    override func draw(_ rect: CGRect) {


        // say you want 8 dots, with perfect fenceposting:

        let totalCount = 8 + 8 - 1

        let fullHeight = bounds.size.height

        let width = bounds.size.width

        let itemLength = fullHeight / CGFloat(totalCount)


        let path = UIBezierPath()


        let beginFromTop = CGFloat(0.0)

        let top = CGPoint(x: width/2, y: beginFromTop)

        let bottom = CGPoint(x: width/2, y: fullHeight)


        path.move(to: top)

        path.addLine(to: bottom)


        path.lineWidth = width


        let dashes: [CGFloat] = [itemLength, itemLength]

        path.setLineDash(dashes, count: dashes.count, phase: 0)


        // for ROUNDED dots, simply change to....

        //let dashes: [CGFloat] = [0.0, itemLength * 2.0]

        //path.lineCapStyle = CGLineCap.round


        dotColor.setStroke()

        path.stroke()

    }

}
Я сделал его вертикальным, вы можете легко изменение.
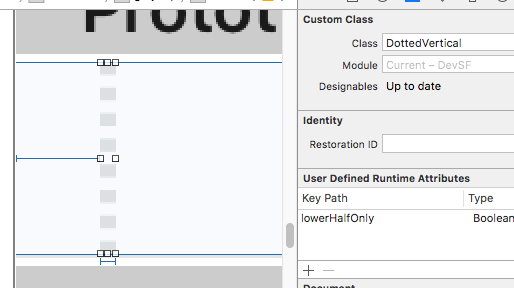
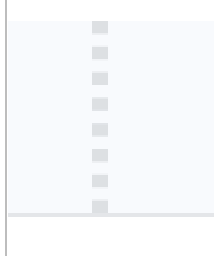
просто поместите UIView в сцену; сделайте его любой шириной, которую вы хотите, и это будет ширина пунктирной линии.
просто измените класс на DottedVertical и вы сделали. Он будет отображаться так правильно в раскадровке.
обратите внимание, что пример кода приведен для высоты блоков ("totalCount" и так далее...) результаты в блоках совершенно, к пикселю, соответствуя с концами UIView, который создает линию.
обязательно отметьте ответ RobMayoff ниже, который дает две необходимые строки кода для точек-не-блоков.
9 ответов:
установите стиль крышки линии в круглое положение и установите длину "on" на крошечное число.
пример Swift playground:
import UIKit
import PlaygroundSupport

let path = UIBezierPath()
path.move(to: CGPoint(x:10,y:10))
path.addLine(to: CGPoint(x:290,y:10))
path.lineWidth = 8

let dashes: [CGFloat] = [0.001, path.lineWidth * 2]
path.setLineDash(dashes, count: dashes.count, phase: 0)
path.lineCapStyle = CGLineCap.round

UIGraphicsBeginImageContextWithOptions(CGSize(width:300, height:20), false, 2)

UIColor.white.setFill()
UIGraphicsGetCurrentContext()!.fill(.infinite)

UIColor.black.setStroke()
path.stroke()

let image = UIGraphicsGetImageFromCurrentImageContext()
let view = UIImageView(image: image)
PlaygroundPage.current.liveView = view

UIGraphicsEndImageContext()
результат:
для objective-C, используя тот же класс примера, что и в вопросе, просто добавьте
CGContextSetLineCap(cx, kCGLineCapRound);перед вызовом
CGContextStrokePath, и изменитьraзначения массива в соответствии с моим Swift-кодом.

Objective-C версия примера Swift выше:
UIBezierPath * path = [[UIBezierPath alloc] init];
[path moveToPoint:CGPointMake(10.0, 10.0)];
[path addLineToPoint:CGPointMake(290.0, 10.0)];
[path setLineWidth:8.0];
CGFloat dashes[] = { path.lineWidth, path.lineWidth * 2 };
[path setLineDash:dashes count:2 phase:0];
[path setLineCapStyle:kCGLineCapRound];
UIGraphicsBeginImageContextWithOptions(CGSizeMake(300, 20), false, 2);
[path stroke];
UIImage * image = UIGraphicsGetImageFromCurrentImageContext();
UIGraphicsEndImageContext();
используя расширение UIView, совместимое с Swift 3.0, должно работать следующее:
extension UIView {

    func addDashedBorder(strokeColor: UIColor, lineWidth: CGFloat) {
        self.layoutIfNeeded()
        let strokeColor = strokeColor.cgColor

        let shapeLayer:CAShapeLayer = CAShapeLayer()
        let frameSize = self.frame.size
        let shapeRect = CGRect(x: 0, y: 0, width: frameSize.width, height: frameSize.height)

        shapeLayer.bounds = shapeRect
        shapeLayer.position = CGPoint(x: frameSize.width/2, y: frameSize.height/2)
        shapeLayer.fillColor = UIColor.clear.cgColor
        shapeLayer.strokeColor = strokeColor
        shapeLayer.lineWidth = lineWidth
        shapeLayer.lineJoin = kCALineJoinRound

        shapeLayer.lineDashPattern = [5,5] // adjust to your liking
        shapeLayer.path = UIBezierPath(roundedRect: CGRect(x: 0, y: 0, width: shapeRect.width, height: shapeRect.height), cornerRadius: self.layer.cornerRadius).cgPath

        self.layer.addSublayer(shapeLayer)
    }

}
затем в функции, которая выполняется после
viewDidLoad, какviewDidLayoutSubviewsвыполнить
Я немного работаю над принятым решением Роба майоффа, чтобы легко настроить пунктирную линию:
- изменить радиус каждого круга.
- изменить количество пробелов между 2 кругами.
- изменить количество шаблонов для создания.
функция возвращает UIImage:
extension UIImage {

    class func dottedLine(radius radius: CGFloat, space: CGFloat, numberOfPattern: CGFloat) -> UIImage {


        let path = UIBezierPath()
        path.moveToPoint(CGPointMake(radius/2, radius/2))
        path.addLineToPoint(CGPointMake((numberOfPattern)*(space+1)*radius, radius/2))
        path.lineWidth = radius

        let dashes: [CGFloat] = [path.lineWidth * 0, path.lineWidth * (space+1)]
        path.setLineDash(dashes, count: dashes.count, phase: 0)
        path.lineCapStyle = CGLineCap.Round


        UIGraphicsBeginImageContextWithOptions(CGSizeMake((numberOfPattern)*(space+1)*radius, radius), false, 1)
        UIColor.whiteColor().setStroke()
        path.stroke()
        let image = UIGraphicsGetImageFromCurrentImageContext()
        UIGraphicsEndImageContext()

        return image

    }
}
а вот как получить изображение:
UIImage.dottedLine(radius: 100, space: 2, numberOfPattern: 1)
Привет, ребята это решение работает для меня нормально. Я нашел где-то и немного изменился, чтобы предотвратить предупреждения консоли.
extension UIImage {
    static func drawDottedImage(width: CGFloat, height: CGFloat, color: UIColor) -> UIImage {
        let path = UIBezierPath()
        path.move(to: CGPoint(x: 1.0, y: 1.0))
        path.addLine(to: CGPoint(x: width, y: 1))
        path.lineWidth = 1.5
        let dashes: [CGFloat] = [path.lineWidth, path.lineWidth * 5]
        path.setLineDash(dashes, count: 2, phase: 0)
        path.lineCapStyle = .butt
        UIGraphicsBeginImageContextWithOptions(CGSize(width: width, height: height), false, 2)
        color.setStroke()
        path.stroke()

        let image: UIImage = UIGraphicsGetImageFromCurrentImageContext()!
        UIGraphicsEndImageContext()

        return image
    }
}
вот результат:

не полный ответ, просто очень!--2-->важно Гоча что Джеймс П поднял в комментарии к любимому ответу:
Он писал:
Я нашел установку on length в 0,01 дает вам круглую точку, в то время как они слегка удлинены при использовании 0.
например,
let dashes: [CGFloat] = [0.001, path.lineWidth * 2]
в swift 3.1 вы можете использовать следующий код:
context.setLineCap(.round)есть три стиля:
 /* Line cap styles. */

public enum CGLineCap : Int32 {

    case butt

    case round

    case square
}
отлично работает с нижеприведенным кодом,
layer.path = linePath.cgPath
layer.lineWidth = 3
layer.lineDashPattern = [1,layer.lineWidth*2] as [NSNumber]
layer.lineCap = "round"
я реализовал следующий фрагмент кода, чтобы добавить границу с пунктирным стилем в нижней части
titleLabel(UILabel) вviewDidAppear:CAShapeLayer *shapelayer = [CAShapeLayer layer]; UIBezierPath *path = [UIBezierPath bezierPath]; [path moveToPoint:CGPointMake(0.0, titileLabel.frame.size.height-2)]; [path addLineToPoint:CGPointMake(SCREEN_WIDTH, titileLabel.frame.size.height-2)]; UIColor *fill = [UIColor colorWithRed:0.80f green:0.80f blue:0.80f alpha:1.00f]; shapelayer.strokeStart = 0.0; shapelayer.strokeColor = fill.CGColor; shapelayer.lineWidth = 2.0; shapelayer.lineJoin = kCALineJoinRound; shapelayer.lineDashPattern = [NSArray arrayWithObjects:[NSNumber numberWithInt:2],[NSNumber numberWithInt:3 ], nil]; shapelayer.path = path.CGPath; [titileLabel.layer addSublayer:shapelayer];
Comments