Как нарисовать круг в iOS Swift?
let block = UIView(frame: CGRectMake(cellWidth-25, cellHeight/2-8, 16, 16))

block.backgroundColor = UIColor(netHex: 0xff3b30)

block.layer.cornerRadius = 9

block.clipsToBounds = true
Это то, что у меня есть прямо сейчас, но это, очевидно, не правильный способ сделать это.
какой самый простой способ сделать это?
6 ответов:
вы можете нарисовать круг с этого:
Swift 2.2:
    let circlePath = UIBezierPath(arcCenter: CGPoint(x: 100,y: 100), radius: CGFloat(20), startAngle: CGFloat(0), endAngle:CGFloat(M_PI * 2), clockwise: true)

    let shapeLayer = CAShapeLayer()
    shapeLayer.path = circlePath.CGPath

    //change the fill color
    shapeLayer.fillColor = UIColor.clearColor().CGColor
    //you can change the stroke color
    shapeLayer.strokeColor = UIColor.redColor().CGColor
    //you can change the line width
    shapeLayer.lineWidth = 3.0

    view.layer.addSublayer(shapeLayer)
Swift 3.0:
    let circlePath = UIBezierPath(arcCenter: CGPoint(x: 100,y: 100), radius: CGFloat(20), startAngle: CGFloat(0), endAngle:CGFloat(Double.pi * 2), clockwise: true)

    let shapeLayer = CAShapeLayer()
    shapeLayer.path = circlePath.cgPath

    //change the fill color
    shapeLayer.fillColor = UIColor.clear.cgColor
    //you can change the stroke color
    shapeLayer.strokeColor = UIColor.red.cgColor
    //you can change the line width
    shapeLayer.lineWidth = 3.0

    view.layer.addSublayer(shapeLayer)
С помощью кода, который вы опубликовали, вы обрезаете углы UIView, а не добавляете круг в представление.
вот полный пример использования этого метода:
// make the UIView a ring of color
import UIKit
class Ring:UIView
    {
    override func drawRect(rect: CGRect)
        {
        drawRingFittingInsideView()
        }

    internal func drawRingFittingInsideView()->()
        {
        let halfSize:CGFloat = min( bounds.size.width/2, bounds.size.height/2)
        let desiredLineWidth:CGFloat = 1    // your desired value

        let circlePath = UIBezierPath(
            arcCenter: CGPoint(x:halfSize,y:halfSize),
            radius: CGFloat( halfSize - (desiredLineWidth/2) ),
            startAngle: CGFloat(0),
            endAngle:CGFloat(M_PI * 2),
            clockwise: true)

        let shapeLayer = CAShapeLayer()
        shapeLayer.path = circlePath.CGPath

        shapeLayer.fillColor = UIColor.clearColor().CGColor
        shapeLayer.strokeColor = UIColor.redColor().CGColor
        shapeLayer.lineWidth = desiredLineWidth

        layer.addSublayer(shapeLayer)
        }
    }
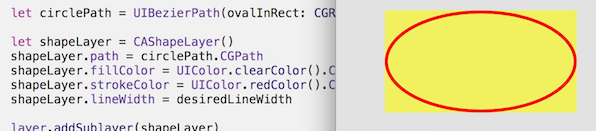
обратите внимание, однако есть невероятно удобно звоните
пусть circlePath = UIBezierPath (ovalInRect: rect)
который делает всю работу по созданию пути. (Не забудьте вставить его для толщины линии, что также невероятно легко с
CGRectInset.)internal func drawRingFittingInsideView(rect: CGRect)->() { let desiredLineWidth:CGFloat = 4 // your desired value let hw:CGFloat = desiredLineWidth/2 let circlePath = UIBezierPath(ovalInRect: CGRectInset(rect,hw,hw) ) let shapeLayer = CAShapeLayer() shapeLayer.path = circlePath.CGPath shapeLayer.fillColor = UIColor.clearColor().CGColor shapeLayer.strokeColor = UIColor.redColor().CGColor shapeLayer.lineWidth = desiredLineWidth layer.addSublayer(shapeLayer) }
на практике в эти дни в Swift, вы, безусловно, использовать
@IBDesignable
и
@IBInspectable
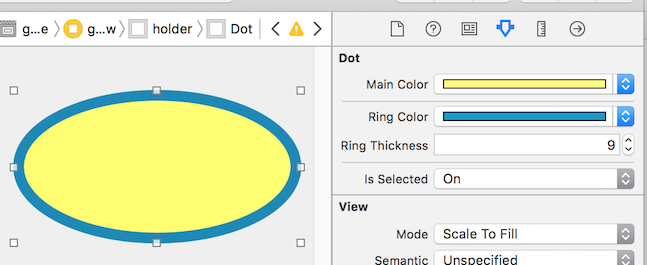
таким образом, вы можете на самом деле посмотреть и изменить рендеринг, в раскадровке!
как вы можете видеть, он фактически добавляет новые функции в Инспектор на раскадровке, которые вы можете изменить на раскадровке:
вот код...
// Dot with border, which you can control completely in Storyboard
import UIKit
@IBDesignable
class Dot:UIView
    {
    @IBInspectable var mainColor: UIColor = UIColor.blueColor()
        {
        didSet { print("mainColor was set here") }
        }
    @IBInspectable var ringColor: UIColor = UIColor.orangeColor()
        {
        didSet { print("bColor was set here") }
        }
    @IBInspectable var ringThickness: CGFloat = 4
        {
        didSet { print("ringThickness was set here") }
        }

    @IBInspectable var isSelected: Bool = true

    override func drawRect(rect: CGRect)
        {
        let dotPath = UIBezierPath(ovalInRect:rect)
        let shapeLayer = CAShapeLayer()
        shapeLayer.path = dotPath.CGPath
        shapeLayer.fillColor = mainColor.CGColor
        layer.addSublayer(shapeLayer)

        if (isSelected) { drawRingFittingInsideView(rect) }
        }

    internal func drawRingFittingInsideView(rect: CGRect)->()
        {
        let hw:CGFloat = ringThickness/2
        let circlePath = UIBezierPath(ovalInRect: CGRectInset(rect,hw,hw) )

        let shapeLayer = CAShapeLayer()
        shapeLayer.path = circlePath.CGPath
        shapeLayer.fillColor = UIColor.clearColor().CGColor
        shapeLayer.strokeColor = ringColor.CGColor
        shapeLayer.lineWidth = ringThickness
        layer.addSublayer(shapeLayer)
        }
    }
наконец, обратите внимание, что если у вас есть UIView (который является квадратным, и который вы установили, чтобы сказать красный в раскадровке), и вы просто хотите превратить его в красный круга, вы можете просто сделать следующее:
// It makes a UIView into a circular dot of color
import UIKit
class Dot:UIView
    {
    override func layoutSubviews()
        { layer.cornerRadius = bounds.size.width/2; }
    }

Если вы хотите использовать UIView, чтобы нарисовать его, то вам нужно сделать радиус / высоты или ширины.
Так что просто измените:
block.layer.cornerRadius = 9to:
block.layer.cornerRadius = block.frame.width / 2вам нужно будет сделать высоту и ширину одинаковыми, однако. Если вы хотите использовать coregraphics, то вы хотите сделать что-то вроде этого:
CGContextRef ctx= UIGraphicsGetCurrentContext();
CGRect bounds = [self bounds];

CGPoint center;
center.x = bounds.origin.x + bounds.size.width / 2.0;
center.y = bounds.origin.y + bounds.size.height / 2.0;
CGContextSaveGState(ctx);

CGContextSetLineWidth(ctx,5);
CGContextSetRGBStrokeColor(ctx,0.8,0.8,0.8,1.0);
CGContextAddArc(ctx,locationOfTouch.x,locationOfTouch.y,30,0.0,M_PI*2,YES);
CGContextStrokePath(ctx);
обновление кода @ Dario для Xcode 8.2.2, Swift 3.x. отметив, что в раскадровке установите цвет фона на "очистить", чтобы избежать черного фона в квадратном UIView:
import UIKit
@IBDesignable
class Dot:UIView
{
    @IBInspectable var mainColor: UIColor = UIColor.clear
        {
        didSet { print("mainColor was set here") }
    }
    @IBInspectable var ringColor: UIColor = UIColor.clear
        {
        didSet { print("bColor was set here") }
    }
    @IBInspectable var ringThickness: CGFloat = 4
        {
        didSet { print("ringThickness was set here") }
    }


    @IBInspectable var isSelected: Bool = true

    override func draw(_ rect: CGRect)
    {

        let dotPath = UIBezierPath(ovalIn: rect)
        let shapeLayer = CAShapeLayer()
        shapeLayer.path = dotPath.cgPath
        shapeLayer.fillColor = mainColor.cgColor
        layer.addSublayer(shapeLayer)

        if (isSelected) { drawRingFittingInsideView(rect: rect) }
    }

    internal func drawRingFittingInsideView(rect: CGRect)->()
    {
        let hw:CGFloat = ringThickness/2
        let circlePath = UIBezierPath(ovalIn: rect.insetBy(dx: hw,dy: hw) )

        let shapeLayer = CAShapeLayer()
        shapeLayer.path = circlePath.cgPath
        shapeLayer.fillColor = UIColor.clear.cgColor
        shapeLayer.strokeColor = ringColor.cgColor
        shapeLayer.lineWidth = ringThickness
        layer.addSublayer(shapeLayer)
    }
}
и если вы хотите контролировать начальный и конечный углы:
import UIKit
@IBDesignable
class Dot:UIView
{
    @IBInspectable var mainColor: UIColor = UIColor.clear
        {
        didSet { print("mainColor was set here") }
    }
    @IBInspectable var ringColor: UIColor = UIColor.clear
        {
        didSet { print("bColor was set here") }
    }
    @IBInspectable var ringThickness: CGFloat = 4
        {
        didSet { print("ringThickness was set here") }
    }


    @IBInspectable var isSelected: Bool = true

    override func draw(_ rect: CGRect)
    {

        let dotPath = UIBezierPath(ovalIn: rect)
        let shapeLayer = CAShapeLayer()
        shapeLayer.path = dotPath.cgPath
        shapeLayer.fillColor = mainColor.cgColor
        layer.addSublayer(shapeLayer)

        if (isSelected) { drawRingFittingInsideView(rect: rect) }
    }

    internal func drawRingFittingInsideView(rect: CGRect)->()
    {
        let halfSize:CGFloat = min( bounds.size.width/2, bounds.size.height/2)
        let desiredLineWidth:CGFloat = ringThickness   // your desired value

        let circlePath = UIBezierPath(
            arcCenter: CGPoint(x: halfSize, y: halfSize),
            radius: CGFloat( halfSize - (desiredLineWidth/2) ),
            startAngle: CGFloat(0),
            endAngle:CGFloat(Double.pi),
            clockwise: true)

        let shapeLayer = CAShapeLayer()
        shapeLayer.path = circlePath.cgPath
        shapeLayer.fillColor = UIColor.clear.cgColor
        shapeLayer.strokeColor = ringColor.cgColor
        shapeLayer.lineWidth = ringThickness
        layer.addSublayer(shapeLayer)
    }
}
создайте класс UIView и назначьте ему этот код для простого круга
import UIKit
@IBDesignable
class DRAW: UIView {

    override func draw(_ rect: CGRect) {

        var path = UIBezierPath()
        path = UIBezierPath(ovalIn: CGRect(x: 50, y: 50, width: 100, height: 100))
        UIColor.yellow.setStroke()
        UIColor.red.setFill()
        path.lineWidth = 5
        path.stroke()
        path.fill()


    }


}
Я нахожу основную графику довольно простой для Swift 3:
if let cgcontext = UIGraphicsGetCurrentContext() {
    cgcontext.strokeEllipse(in: CGRect(x: center.x-diameter/2, y: center.y-diameter/2, width: diameter, height: diameter))
}
добавить в поле зрения сделал load
    //Circle Points

     var CircleLayer   = CAShapeLayer()

    let center = CGPoint (x: myCircleView.frame.size.width / 2, y: myCircleView.frame.size.height / 2)
    let circleRadius = myCircleView.frame.size.width / 2
    let circlePath = UIBezierPath(arcCenter: center, radius: circleRadius, startAngle: CGFloat(M_PI), endAngle: CGFloat(M_PI * 4), clockwise: true)
    CircleLayer.path = circlePath.cgPath
   CircleLayer.strokeColor = UIColor.red.cgColor
    CircleLayer.fillColor = UIColor.blue.cgColor
    CircleLayer.lineWidth = 8
    CircleLayer.strokeStart = 0
    CircleLayer.strokeEnd  = 1
    Self.View.layer.addSublayer(CircleLayer)
Comments