12 ответов:
Xcode 8.2.1 * Swift 3.0.2
import UIKit

class ViewController: UIViewController, UINavigationControllerDelegate, UIImagePickerControllerDelegate {

    @IBOutlet weak var imageView: UIImageView!
    @IBOutlet weak var filterButton: UIButton!
    @IBOutlet weak var saveButton: UIButton!

    let destinationUrl = FileManager.default.urls(for: .documentDirectory, in: .userDomainMask).first!
        .appendingPathComponent("filteredImage.png")
    let imagePicker = UIImagePickerController()
    let messageFrame = UIView()
    var activityIndicator = UIActivityIndicatorView()
    var strLabel = UILabel()

    let effectView = UIVisualEffectView(effect: UIBlurEffect(style: .dark))

    func activityIndicator(_ title: String) {

        strLabel.removeFromSuperview()
        activityIndicator.removeFromSuperview()
        effectView.removeFromSuperview()

        strLabel = UILabel(frame: CGRect(x: 50, y: 0, width: 160, height: 46))
        strLabel.text = title
        strLabel.font = .systemFont(ofSize: 14, weight: UIFontWeightMedium)
        strLabel.textColor = UIColor(white: 0.9, alpha: 0.7)

        effectView.frame = CGRect(x: view.frame.midX - strLabel.frame.width/2, y: view.frame.midY - strLabel.frame.height/2 , width: 160, height: 46)
        effectView.layer.cornerRadius = 15
        effectView.layer.masksToBounds = true

        activityIndicator = UIActivityIndicatorView(activityIndicatorStyle: .white)
        activityIndicator.frame = CGRect(x: 0, y: 0, width: 46, height: 46)
        activityIndicator.startAnimating()

        effectView.addSubview(activityIndicator)
        effectView.addSubview(strLabel)
        view.addSubview(effectView)
    }

    func saveImage() {
        do {
            try imageView.image?.data?.write(to: destinationUrl, options: .atomic)
            print("file saved")
        } catch {
            print(error)
        }
    }

    func applyFilterToImage() {
        imageView.image = imageView.image?.applying(contrast: 1.5)
    }

    override func viewDidLoad() {
        super.viewDidLoad()
        guard let url = URL(string: "https://upload.wikimedia.org/wikipedia/commons/a/a8/VST_images_the_Lagoon_Nebula.jpg"), let data = try? Data(contentsOf: url), let image = UIImage(data: data) else { return }
        view.backgroundColor = UIColor(white: 0, alpha: 1)
        imageView.image = image
    }

    @IBAction func startSavingImage(_ sender: AnyObject) {
        saveButton.isEnabled = false
        filterButton.isEnabled = false
        activityIndicator("Saving Image")
        DispatchQueue.main.async {
            self.saveImage()
            DispatchQueue.main.async {
                self.effectView.removeFromSuperview()
                self.saveButton.isEnabled = true
                self.filterButton.isEnabled = true
            }
        }
    }

    @IBAction func filterAction(_ sender: AnyObject) {
        filterButton.isEnabled = false
        saveButton.isEnabled = false
        activityIndicator("Applying Filter")
        DispatchQueue.main.async {
            self.applyFilterToImage()
            DispatchQueue.main.async {
                self.effectView.removeFromSuperview()
                self.filterButton.isEnabled = true
                self.saveButton.isEnabled = true
            }
        }
    }

    @IBAction func cameraAction(_ sender: AnyObject) {
        if UIImagePickerController.isSourceTypeAvailable(.camera) {
            imagePicker.delegate = self
            imagePicker.sourceType = .camera
            present(imagePicker, animated: true)
        }
    }

    func imagePickerController(_ picker: UIImagePickerController, didFinishPickingImage image: UIImage!, editingInfo: [AnyHashable: Any]!) {
        dismiss(animated: true, completion: nil)
        imageView.image = image
    }

}

extension Data {
    var image: UIImage? { return UIImage(data: self) }
}

extension UIImage {
    var data: Data? { return UIImagePNGRepresentation(self) }
    func applying(contrast value: NSNumber) -> UIImage? {
        guard let ciImage = CIImage(image: self)?.applyingFilter("CIColorControls", withInputParameters: [kCIInputContrastKey: value]) else { return nil }
        UIGraphicsBeginImageContextWithOptions(size, false, scale)
        defer { UIGraphicsEndImageContext() }
        UIImage(ciImage: ciImage).draw(in: CGRect(origin: .zero, size: size))
        return UIGraphicsGetImageFromCurrentImageContext()
    }
}
Xcode 9.0 * Swift 4.0
    func activityIndicator(_ title: String) {

        strLabel.removeFromSuperview()
        activityIndicator.removeFromSuperview()
        effectView.removeFromSuperview()

        strLabel = UILabel(frame: CGRect(x: 50, y: 0, width: 160, height: 46))
        strLabel.text = title
        strLabel.font = .systemFont(ofSize: 14, weight: .medium)
        strLabel.textColor = UIColor(white: 0.9, alpha: 0.7)

        effectView.frame = CGRect(x: view.frame.midX - strLabel.frame.width/2, y: view.frame.midY - strLabel.frame.height/2 , width: 160, height: 46)
        effectView.layer.cornerRadius = 15
        effectView.layer.masksToBounds = true

        activityIndicator = UIActivityIndicatorView(activityIndicatorStyle: .white)
        activityIndicator.frame = CGRect(x: 0, y: 0, width: 46, height: 46)
        activityIndicator.startAnimating()

        effectView.contentView.addSubview(activityIndicator)
        effectView.contentView.addSubview(strLabel)
        view.addSubview(effectView)
    }
в то время как ответ Esq работает, я добавил свою собственную реализацию, которая больше соответствует хорошей архитектуре компонентов, разделив представление на собственный класс. Он также использует динамическое размытие, введенное в iOS 8.
вот как мой выглядит с фоном изображения:
код для этого инкапсулирован в свой собственный класс UIView, что означает, что вы можете использовать его, когда захотите.
обновлено для Swift 3
использование
func viewDidLoad() {
  super.viewDidLoad()

  // Create and add the view to the screen.
  let progressHUD = ProgressHUD(text: "Saving Photo")
  self.view.addSubview(progressHUD)
  // All done!

  self.view.backgroundColor = UIColor.black
}
Код UIView
import UIKit

class ProgressHUD: UIVisualEffectView {

  var text: String? {
    didSet {
      label.text = text
    }
  }

  let activityIndictor: UIActivityIndicatorView = UIActivityIndicatorView(activityIndicatorStyle: UIActivityIndicatorViewStyle.gray)
  let label: UILabel = UILabel()
  let blurEffect = UIBlurEffect(style: .light)
  let vibrancyView: UIVisualEffectView

  init(text: String) {
    self.text = text
    self.vibrancyView = UIVisualEffectView(effect: UIVibrancyEffect(blurEffect: blurEffect))
    super.init(effect: blurEffect)
    self.setup()
  }

  required init?(coder aDecoder: NSCoder) {
    self.text = ""
    self.vibrancyView = UIVisualEffectView(effect: UIVibrancyEffect(blurEffect: blurEffect))
    super.init(coder: aDecoder)
    self.setup()
  }

  func setup() {
    contentView.addSubview(vibrancyView)
    contentView.addSubview(activityIndictor)
    contentView.addSubview(label)
    activityIndictor.startAnimating()
  }

  override func didMoveToSuperview() {
    super.didMoveToSuperview()

    if let superview = self.superview {

      let width = superview.frame.size.width / 2.3
      let height: CGFloat = 50.0
      self.frame = CGRect(x: superview.frame.size.width / 2 - width / 2,
                      y: superview.frame.height / 2 - height / 2,
                      width: width,
                      height: height)
      vibrancyView.frame = self.bounds

      let activityIndicatorSize: CGFloat = 40
      activityIndictor.frame = CGRect(x: 5,
                                      y: height / 2 - activityIndicatorSize / 2,
                                      width: activityIndicatorSize,
                                      height: activityIndicatorSize)

      layer.cornerRadius = 8.0
      layer.masksToBounds = true
      label.text = text
      label.textAlignment = NSTextAlignment.center
      label.frame = CGRect(x: activityIndicatorSize + 5,
                           y: 0,
                           width: width - activityIndicatorSize - 15,
                           height: height)
      label.textColor = UIColor.gray
      label.font = UIFont.boldSystemFont(ofSize: 16)
    }
  }

  func show() {
    self.isHidden = false
  }

  func hide() {
    self.isHidden = true
  }
}
Swift 2
пример того, как его использовать, выглядит так:
override func viewDidLoad() {
    super.viewDidLoad()

    // Create and add the view to the screen.
    let progressHUD = ProgressHUD(text: "Saving Photo")
    self.view.addSubview(progressHUD)
    // All done!

    self.view.backgroundColor = UIColor.blackColor()
}
вот код UIView:
import UIKit

class ProgressHUD: UIVisualEffectView {

    var text: String? {
        didSet {
            label.text = text
        }
    }
    let activityIndictor: UIActivityIndicatorView = UIActivityIndicatorView(activityIndicatorStyle: UIActivityIndicatorViewStyle.White)
    let label: UILabel = UILabel()
    let blurEffect = UIBlurEffect(style: .Light)
    let vibrancyView: UIVisualEffectView

    init(text: String) {
        self.text = text
        self.vibrancyView = UIVisualEffectView(effect: UIVibrancyEffect(forBlurEffect: blurEffect))
        super.init(effect: blurEffect)
        self.setup()
    }

    required init(coder aDecoder: NSCoder) {
        self.text = ""
        self.vibrancyView = UIVisualEffectView(effect: UIVibrancyEffect(forBlurEffect: blurEffect))
        super.init(coder: aDecoder)
        self.setup()

    }

    func setup() {
        contentView.addSubview(vibrancyView)
        vibrancyView.contentView.addSubview(activityIndictor)
        vibrancyView.contentView.addSubview(label)
        activityIndictor.startAnimating()
    }

    override func didMoveToSuperview() {
        super.didMoveToSuperview()

        if let superview = self.superview {

            let width = superview.frame.size.width / 2.3
            let height: CGFloat = 50.0
            self.frame = CGRectMake(superview.frame.size.width / 2 - width / 2,
                superview.frame.height / 2 - height / 2,
                width,
                height)
            vibrancyView.frame = self.bounds

            let activityIndicatorSize: CGFloat = 40
            activityIndictor.frame = CGRectMake(5, height / 2 - activityIndicatorSize / 2,
                activityIndicatorSize,
                activityIndicatorSize)

            layer.cornerRadius = 8.0
            layer.masksToBounds = true
            label.text = text
            label.textAlignment = NSTextAlignment.Center
            label.frame = CGRectMake(activityIndicatorSize + 5, 0, width - activityIndicatorSize - 15, height)
            label.textColor = UIColor.grayColor()
            label.font = UIFont.boldSystemFontOfSize(16)
        }
    }

    func show() {
        self.hidden = false
    }

    func hide() {
        self.hidden = true
    }
}
Я надеюсь, что это поможет, пожалуйста, не стесняйтесь использовать этот код везде, где вам нужно.
вот как выглядит этот код:
вот мой код перетаскивания:
var boxView = UIView()

override func viewDidLoad() {
    super.viewDidLoad()
    // Do any additional setup after loading the view, typically from a nib.

    view.backgroundColor = UIColor.blackColor()
    addSavingPhotoView()

    //Custom button to test this app
    var button = UIButton(frame: CGRect(x: 20, y: 20, width: 20, height: 20))
    button.backgroundColor = UIColor.redColor()
    button.addTarget(self, action: "buttonAction:", forControlEvents: UIControlEvents.TouchUpInside)

    view.addSubview(button)
}

func addSavingPhotoView() {
    // You only need to adjust this frame to move it anywhere you want
    boxView = UIView(frame: CGRect(x: view.frame.midX - 90, y: view.frame.midY - 25, width: 180, height: 50))
    boxView.backgroundColor = UIColor.whiteColor()
    boxView.alpha = 0.8
    boxView.layer.cornerRadius = 10

    //Here the spinnier is initialized
    var activityView = UIActivityIndicatorView(activityIndicatorStyle: UIActivityIndicatorViewStyle.Gray)
    activityView.frame = CGRect(x: 0, y: 0, width: 50, height: 50)
    activityView.startAnimating()

    var textLabel = UILabel(frame: CGRect(x: 60, y: 0, width: 200, height: 50))
    textLabel.textColor = UIColor.grayColor()
    textLabel.text = "Saving Photo"

    boxView.addSubview(activityView)
    boxView.addSubview(textLabel)

    view.addSubview(boxView)
}

func buttonAction(sender:UIButton!) {
    //When button is pressed it removes the boxView from screen
    boxView.removeFromSuperview()
}
вот версия с открытым исходным кодом этого:https://github.com/goktugyil/CozyLoadingActivity
основываясь на моем предыдущем ответе, вот более элегантное решение с пользовательским классом:
сначала определите этот пользовательский класс:
import UIKit
import Foundation

class ActivityIndicatorView
{
    var view: UIView!

var activityIndicator: UIActivityIndicatorView!

var title: String!

init(title: String, center: CGPoint, width: CGFloat = 200.0, height: CGFloat = 50.0)
{
    self.title = title

    let x = center.x - width/2.0
    let y = center.y - height/2.0

    self.view = UIView(frame: CGRect(x: x, y: y, width: width, height: height))
    self.view.backgroundColor = UIColor(red: 255.0/255.0, green: 204.0/255.0, blue: 51.0/255.0, alpha: 0.5)
    self.view.layer.cornerRadius = 10

    self.activityIndicator = UIActivityIndicatorView(frame: CGRect(x: 0, y: 0, width: 50, height: 50))
    self.activityIndicator.color = UIColor.blackColor()
    self.activityIndicator.hidesWhenStopped = false

    let titleLabel = UILabel(frame: CGRect(x: 60, y: 0, width: 200, height: 50))
    titleLabel.text = title
    titleLabel.textColor = UIColor.blackColor()

    self.view.addSubview(self.activityIndicator)
    self.view.addSubview(titleLabel)
}

func getViewActivityIndicator() -> UIView
{
    return self.view
}

func startAnimating()
{
    self.activityIndicator.startAnimating()
    UIApplication.sharedApplication().beginIgnoringInteractionEvents()
}

func stopAnimating()
{
    self.activityIndicator.stopAnimating()
    UIApplication.sharedApplication().endIgnoringInteractionEvents()

    self.view.removeFromSuperview()
}
//end
}
Теперь на вашем
UIViewControllerкласс:var activityIndicatorView: ActivityIndicatorView! override func viewDidLoad() { super.viewDidLoad() self.activityIndicatorView = ActivityIndicatorView(title: "Processing...", center: self.view.center) self.view.addSubview(self.activityIndicatorView.getViewActivityIndicator()) } func doSomething() { self.activityIndicatorView.startAnimating() UIApplication.sharedApplication().beginIgnoringInteractionEvents() //do something here that will taking time self.activityIndicatorView.stopAnimating() }
для индикатора активности лучше создать один пользовательский класс.
вместо создания
UIActivityIndicatorв каждом элементеUIViewController.ПодклассUIViewи сUIViewController.import UIKit import Foundation class ProgressIndicator: UIView { var indicatorColor:UIColor var loadingViewColor:UIColor var loadingMessage:String var messageFrame = UIView() var activityIndicator = UIActivityIndicatorView() init(inview:UIView,loadingViewColor:UIColor,indicatorColor:UIColor,msg:String){ self.indicatorColor = indicatorColor self.loadingViewColor = loadingViewColor self.loadingMessage = msg super.init(frame: CGRectMake(inview.frame.midX - 150, inview.frame.midY - 25 , 300, 50)) initalizeCustomIndicator() } convenience init(inview:UIView) { self.init(inview: inview,loadingViewColor: UIColor.brownColor(),indicatorColor:UIColor.blackColor(), msg: "Loading..") } convenience init(inview:UIView,messsage:String) { self.init(inview: inview,loadingViewColor: UIColor.brownColor(),indicatorColor:UIColor.blackColor(), msg: messsage) } required init?(coder aDecoder: NSCoder) { fatalError("init(coder:) has not been implemented") } func initalizeCustomIndicator(){ messageFrame.frame = self.bounds activityIndicator = UIActivityIndicatorView(activityIndicatorStyle: UIActivityIndicatorViewStyle.White) activityIndicator.tintColor = indicatorColor activityIndicator.hidesWhenStopped = true activityIndicator.frame = CGRect(x: self.bounds.origin.x + 6, y: 0, width: 20, height: 50) print(activityIndicator.frame) let strLabel = UILabel(frame:CGRect(x: self.bounds.origin.x + 30, y: 0, width: self.bounds.width - (self.bounds.origin.x + 30) , height: 50)) strLabel.text = loadingMessage strLabel.adjustsFontSizeToFitWidth = true strLabel.textColor = UIColor.whiteColor() messageFrame.layer.cornerRadius = 15 messageFrame.backgroundColor = loadingViewColor messageFrame.alpha = 0.8 messageFrame.addSubview(activityIndicator) messageFrame.addSubview(strLabel) } func start(){ //check if view is already there or not..if again started if !self.subviews.contains(messageFrame){ activityIndicator.startAnimating() self.addSubview(messageFrame) } } func stop(){ if self.subviews.contains(messageFrame){ activityIndicator.stopAnimating() messageFrame.removeFromSuperview() } } }поместите этот класс в свой проект, а затем вызовите из любого ViewController как
var indicator:ProgressIndicator?
override func viewDidLoad() {
    super.viewDidLoad()

    //indicator = ProgressIndicator(inview: self.view,messsage: "Hello from Nepal..")
    //self.view.addSubview(indicator!)
    //OR
    indicator = ProgressIndicator(inview:self.view,loadingViewColor: UIColor.grayColor(), indicatorColor: UIColor.blackColor(), msg: "Landing within minutes,Please hold tight..")
    self.view.addSubview(indicator!)

}

@IBAction func startBtn(sender: AnyObject) {
    indicator!.start()
}


@IBAction func stopBtn(sender: AnyObject) {
    indicator!.stop()
}
вы можете создать свой собственный. Например:
создать вид с белым фоном и закругленными углами:
var view = UIView(frame: CGRect(x: 0, y: 0, width: 300, height: 50))
view.backgroundColor = UIColor.whiteColor()
view.layer.cornerRadius = 10
добавить два подвида, a
UIActivityIndicatorViewиUILabel:var wait = UIActivityIndicatorView(frame: CGRect(x: 0, y: 0, width: 50, height: 50)) wait.color = UIColor.blackColor() wait.hidesWhenStopped = false var text = UILabel(frame: CGRect(x: 60, y: 0, width: 200, height: 50)) text.text = "Processing..." view.addSubview(wait) view.addSubview(text)
Для Swift 3
использование
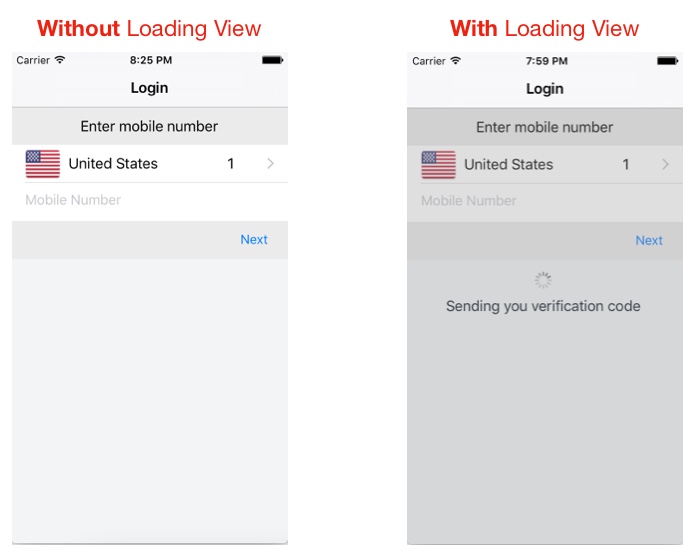
class LoginTVC: UITableViewController {
    var loadingView : LoadingView!

    override func viewDidLoad() {
        super.viewDidLoad()

        // CASE 1: To Show loadingView on load

        loadingView = LoadingView(uiView: view, message: "Sending you verification code")
    }

    // CASE 2: To show loadingView on click of a button

    @IBAction func showLoadingView(_ sender: UIButton) {
        if let loaderView = loadingView{ // If loadingView already exists
            if loaderView.isHidden() {
                loaderView.show()  // To show activity indicator
            }
        }
        else{
            loadingView = LoadingView(uiView: view, message: "Sending you verification code")
         }
    }
}

    // CASE 3: To hide LoadingView on click of a button

    @IBAction func hideLoadingView(_ sender: UIButton) {
        if let loaderView = loadingView{ // If loadingView already exists
            self.loadingView.hide()
        }
    }
}
LoadingView Class
class LoadingView {

    let uiView          :   UIView
    let message         :   String
    let messageLabel    =   UILabel()

    let loadingSV       =   UIStackView()
    let loadingView     =   UIView()
    let activityIndicator: UIActivityIndicatorView = UIActivityIndicatorView(activityIndicatorStyle: UIActivityIndicatorViewStyle.gray)

    init(uiView: UIView, message: String) {
        self.uiView     =   uiView
        self.message    =   message
        self.setup()
    }

    func setup(){
        let viewWidth   = uiView.bounds.width
        let viewHeight  = uiView.bounds.height

        // Configuring the message label
        messageLabel.text             = message
        messageLabel.textColor        = UIColor.darkGray
        messageLabel.textAlignment    = .center
        messageLabel.numberOfLines    = 3
        messageLabel.lineBreakMode    = .byWordWrapping

        // Creating stackView to center and align Label and Activity Indicator
        loadingSV.axis          = .vertical
        loadingSV.distribution  = .equalSpacing
        loadingSV.alignment     = .center
        loadingSV.addArrangedSubview(activityIndicator)
        loadingSV.addArrangedSubview(messageLabel)

        // Creating loadingView, this acts as a background for label and activityIndicator
        loadingView.frame           = uiView.frame
        loadingView.center          = uiView.center
        loadingView.backgroundColor = UIColor.darkGray.withAlphaComponent(0.3)
        loadingView.clipsToBounds   = true

        // Disabling auto constraints
        loadingSV.translatesAutoresizingMaskIntoConstraints = false

        // Adding subviews
        loadingView.addSubview(loadingSV)
        uiView.addSubview(loadingView)
        activityIndicator.startAnimating()

        // Views dictionary
        let views = [
            "loadingSV": loadingSV
        ]

        // Constraints for loadingSV
        uiView.addConstraints(NSLayoutConstraint.constraints(withVisualFormat: "H:|-[loadingSV(300)]-|", options: [], metrics: nil, views: views))
        uiView.addConstraints(NSLayoutConstraint.constraints(withVisualFormat: "V:|-\(viewHeight / 3)-[loadingSV(50)]-|", options: [], metrics: nil, views: views))
    }

    // Call this method to hide loadingView
    func show() {
        loadingView.isHidden = false
    }

    // Call this method to show loadingView
    func hide(){
        loadingView.isHidden = true
    }

    // Call this method to check if loading view already exists
    func isHidden() -> Bool{
        if loadingView.isHidden == false{
            return false
        }
        else{
            return true
        }
    }
}
на основе ответа "MirekE" вот код, который я тестировал сейчас и его работа:
var activityIndicator: UIActivityIndicatorView!

var viewActivityIndicator: UIView!

override func viewDidLoad()
{
    super.viewDidLoad()

    let width: CGFloat = 200.0
    let height: CGFloat = 50.0
    let x = self.view.frame.width/2.0 - width/2.0
    let y = self.view.frame.height/2.0 - height/2.0

    self.viewActivityIndicator = UIView(frame: CGRect(x: x, y: y, width: width, height: height))
    self.viewActivityIndicator.backgroundColor = UIColor(red: 255.0/255.0, green: 204.0/255.0, blue: 51.0/255.0, alpha: 0.5)
    self.viewActivityIndicator.layer.cornerRadius = 10

    self.activityIndicator = UIActivityIndicatorView(frame: CGRect(x: 0, y: 0, width: 50, height: 50))
    self.activityIndicator.color = UIColor.blackColor()
    self.activityIndicator.hidesWhenStopped = false

    let titleLabel = UILabel(frame: CGRect(x: 60, y: 0, width: 200, height: 50))
    titleLabel.text = "Processing..."

    self.viewActivityIndicator.addSubview(self.activityIndicator)
    self.viewActivityIndicator.addSubview(titleLabel)

    self.view.addSubview(self.viewActivityIndicator)
}

func doSometing()
{
    self.activityIndicator.startAnimating()
    UIApplication.sharedApplication().beginIgnoringInteractionEvents()

    //do something here that will taking time

    self.activityIndicator.stopAnimating()
    UIApplication.sharedApplication().endIgnoringInteractionEvents()
    self.viewActivityIndicator.removeFromSuperview()
}
простой класс контроллера активности !!!
class ActivityIndicator: UIVisualEffectView {


let activityIndictor: UIActivityIndicatorView = UIActivityIndicatorView(activityIndicatorStyle: UIActivityIndicatorViewStyle.WhiteLarge)
let label: UILabel = UILabel()
let blurEffect = UIBlurEffect(style: .Dark)
let vibrancyView: UIVisualEffectView

init() {

    self.vibrancyView = UIVisualEffectView(effect: UIVibrancyEffect(forBlurEffect: blurEffect))
    super.init(effect: blurEffect)
    self.setup()
}

required init?(coder aDecoder: NSCoder) {

    self.vibrancyView = UIVisualEffectView(effect: UIVibrancyEffect(forBlurEffect: blurEffect))
    super.init(coder: aDecoder)
    self.setup()
}

func setup() {

    contentView.addSubview(vibrancyView)
    vibrancyView.contentView.addSubview(activityIndictor)
    activityIndictor.startAnimating()
}

override func didMoveToSuperview() {
    super.didMoveToSuperview()

    if let superview = self.superview {
        let width: CGFloat = 75.0
        let height: CGFloat = 75.0
        self.frame = CGRectMake(superview.frame.size.width / 2 - width / 2,
                                superview.frame.height / 2 - height / 2,
                                width,
                                height)
        vibrancyView.frame = self.bounds
        let activityIndicatorSize: CGFloat = 40
        activityIndictor.frame = CGRectMake(18, height / 2 - activityIndicatorSize / 2,
                                            activityIndicatorSize,
                                            activityIndicatorSize)
        layer.cornerRadius = 8.0
        layer.masksToBounds = true

    }
}

func show() {
    self.hidden = false
}

func hide() {
    self.hidden = true
}}
использование :-
let activityIndicator = ActivityIndicator()
    self.view.addSubview(activityIndicator)
скрывать :-
activityIndicator.hide()
этот код работает в SWIFT 2.0.
необходимо объявить переменную для инициализации UIActivityIndicatorView
let actInd: UIActivityIndicatorView = UIActivityIndicatorView()после инициализации поместите этот код в контроллер.
actInd.center = ImageView.center
actInd.activityIndicatorViewStyle = UIActivityIndicatorViewStyle.WhiteLarge
view.addSubview(actInd)
actInd.startAnimating()
после завершения процесса загрузки затем скрыть анимацию.
self.actInd.stopAnimating()
с автоматической поддержкой ширины и темы также обнаруживает поворот во время занятости (версия Swift 3)
используйте его, как показано ниже;
    var progressView:ProgressView?;
    override func viewDidAppear(_ animated: Bool) {
        super.viewDidAppear(animated);
        self.progressView = ProgressView(Message: "Work in progress!",
                                             Theme:.Dark,
                                             IsModal:true);
    }

    @IBAction func onPause(_ sender: AnyObject) {
        self.progressView.show();
    }

    @IBAction func onResume(_ sender: AnyObject) {
        self.progressView.hide();
    }
ProgressView.Свифт
    import Foundation
    import UIKit;

    class ProgressView: UIView {

        enum Theme {
            case Light
            case Dark
        }

        var theme:Theme;
        var container:UIStackView;
        var activityIndicator: UIActivityIndicatorView;
        var label: UILabel;
        var glass:UIView;


        private var Message:String;
        private var isModal:Bool;

        init(Message: String,Theme:Theme, IsModal:Bool) {
            //init
            self.Message = Message;
            self.theme=Theme;
            self.isModal=IsModal;

            self.container=UIStackView();
            self.activityIndicator=UIActivityIndicatorView();
            self.label = UILabel();
            self.glass = UIView();
            //get proper width by text message
            let fontName=self.label.font.fontName;
            let fontSize=self.label.font.pointSize;
            if let font = UIFont(name: fontName, size: fontSize)
            {
                let fontAttributes = [NSFontAttributeName: font];
                let size = (Message as NSString).size(attributes: fontAttributes)
                super.init(frame: CGRect(x: 0, y: 0, width: size.width + 50, height: 50));
            }else{
                super.init(frame: CGRect(x: 0, y: 0, width: 200, height: 50));
            }

            //detect rotation
            NotificationCenter.default.addObserver(self, selector: #selector(onRotate), name: NSNotification.Name.UIDeviceOrientationDidChange, object: nil);

            //style
            self.layer.cornerRadius = 3;
            if (self.theme == .Dark){
                self.backgroundColor=UIColor.darkGray;
            }else{
                self.backgroundColor=UIColor.lightGray;
            }

            //label
            if self.theme == .Dark{
                self.label.textColor=UIColor.white;
            }else{
                self.label.textColor=UIColor.black;
            }
            self.label.text=self.Message;
            //container
            self.container.frame=self.frame;
            self.container.spacing=5;
            self.container.layoutMargins = UIEdgeInsets(top: 5, left: 5, bottom: 5, right: 5);
            self.container.isLayoutMarginsRelativeArrangement = true
            //Activity indicator
            if (self.theme == .Dark){
                self.activityIndicator = UIActivityIndicatorView(activityIndicatorStyle:.whiteLarge);
                self.activityIndicator.color = UIColor.white;
            }else{
                self.activityIndicator = UIActivityIndicatorView(activityIndicatorStyle:.whiteLarge);
                self.activityIndicator.color = UIColor.black;
            }
            self.activityIndicator.startAnimating();
            //Add them to container

            //First glass
            if let superview = UIApplication.shared.keyWindow {
                if (self.isModal){
                    //glass
                    self.glass.frame=superview.frame;
                    if (self.theme == .Dark){
                        self.glass.backgroundColor  = UIColor.black.withAlphaComponent(0.5);
                    }else{
                        self.glass.backgroundColor  = UIColor.white.withAlphaComponent(0.5);
                    }
                    superview.addSubview(glass);
                }
            }
            //Then activity indicator and label
            container.addArrangedSubview(self.activityIndicator);
            container.addArrangedSubview(self.label);
            //Last attach it to container (StackView)
            self.addSubview(container);
            if let superview = UIApplication.shared.keyWindow {
                self.center=superview.center;
                superview.addSubview(self);
            }
            //Do not show until show() is called;
            self.hide();
        }

        required init(coder: NSCoder) {
            self.theme = .Dark;
            self.Message = "Not set!";
            self.isModal=true;
            self.container=UIStackView();
            self.activityIndicator=UIActivityIndicatorView();
            self.label = UILabel();
            self.glass = UIView();
            super.init(coder: coder)!
        }

        func onRotate(){
            if let superview = self.superview {
                self.glass.frame=superview.frame;
                self.center=superview.center;
    //            superview.addSubview(self);
            }
        }

        public func show() {
            self.glass.isHidden=false;
            self.isHidden = false
        }

        public func hide() {
            self.glass.isHidden=true;
            self.isHidden=true;
        }
    }
В Swift 3
объявлять переменные, которые мы будем использовать
var activityIndicator = UIActivityIndicatorView()
let loadingView = UIView()
let loadingLabel = UILabel()
установить метку, вид и activityIndicator
func setLoadingScreen(myMsg : String) {
    let width: CGFloat = 120
    let height: CGFloat = 30
    let x = (self.view.frame.width / 2) - (width / 2)
    let y = (169 / 2) - (height / 2) + 60
    loadingView.frame = CGRect(x: x, y: y, width: width, height: height)
    self.loadingLabel.textColor = UIColor.white
    self.loadingLabel.textAlignment = NSTextAlignment.center
    self.loadingLabel.text = myMsg
    self.loadingLabel.frame = CGRect(x: 0, y: 0, width: 160, height: 30)
    self.loadingLabel.isHidden = false
    self.activityIndicator.activityIndicatorViewStyle = UIActivityIndicatorViewStyle.white
    self.activityIndicator.frame = CGRect(x: 0, y: 0, width: 30, height: 30)
    self.activityIndicator.startAnimating()
    loadingView.addSubview(self.spinner)
    loadingView.addSubview(self.loadingLabel)
    self.view.addSubview(loadingView)
}
Запустить Анимацию
@IBAction func start_animation(_ sender: Any) {
    setLoadingScreen(myMsg: "Loading...")
}
Остановить Анимацию
@IBAction func stop_animation(_ sender: Any) {
    self.spinner.stopAnimating()
    UIApplication.shared.endIgnoringInteractionEvents()
    self.loadingLabel.isHidden = true
}
Comments