Как встроить маленький значок в UILabel
мне нужно вставлять небольшие значки (вроде пользовательских пуль ) в мой UILabel в iOS7.
Как я могу сделать это в конструкторе интерфейса? Или хотя бы в коде?
В Android есть leftDrawable и rightDrawable для ярлыков, но как это делается в iOS?
Пример в android:

15 ответов:
вы можете сделать это с текстовыми вложениями iOS 7, которые являются частью TextKit. Некоторые примеры кода:
NSTextAttachment *attachment = [[NSTextAttachment alloc] init];
attachment.image = [UIImage imageNamed:@"MyIcon.png"];

NSAttributedString *attachmentString = [NSAttributedString attributedStringWithAttachment:attachment];

NSMutableAttributedString *myString= [[NSMutableAttributedString alloc] initWithString:@"My label text"];
[myString appendAttributedString:attachmentString];

myLabel.attributedText = myString;
вот способ встроить значок в UILabel.
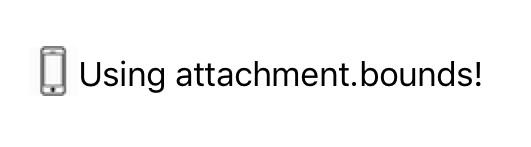
и выровнять значок использовать вложение.границы
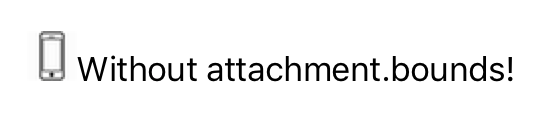
Swift Версия
//Create Attachment
let imageAttachment =  NSTextAttachment()
imageAttachment.image = UIImage(named:"iPhoneIcon")
//Set bound to reposition
let imageOffsetY:CGFloat = -5.0;
imageAttachment.bounds = CGRect(x: 0, y: imageOffsetY, width: imageAttachment.image!.size.width, height: imageAttachment.image!.size.height)
//Create string with attachment
let attachmentString = NSAttributedString(attachment: imageAttachment)
//Initialize mutable string
let completeText = NSMutableAttributedString(string: "")
//Add image to mutable string
completeText.append(attachmentString)
//Add your text to mutable string
let  textAfterIcon = NSMutableAttributedString(string: "Using attachment.bounds!")
completeText.append(textAfterIcon)
self.mobileLabel.textAlignment = .center;
self.mobileLabel.attributedText = completeText;
Objective-C Version
 NSTextAttachment *imageAttachment = [[NSTextAttachment alloc] init];
imageAttachment.image = [UIImage imageNamed:@"iPhoneIcon"];
CGFloat imageOffsetY = -5.0;
imageAttachment.bounds = CGRectMake(0, imageOffsetY, imageAttachment.image.size.width, imageAttachment.image.size.height);
NSAttributedString *attachmentString = [NSAttributedString attributedStringWithAttachment:imageAttachment];
NSMutableAttributedString *completeText= [[NSMutableAttributedString alloc] initWithString:@""];
[completeText appendAttributedString:attachmentString];
NSMutableAttributedString *textAfterIcon= [[NSMutableAttributedString alloc] initWithString:@"Using attachment.bounds!"];
[completeText appendAttributedString:textAfterIcon];
self.mobileLabel.textAlignment=NSTextAlignmentRight;
self.mobileLabel.attributedText=completeText;
Swift 4.2:
let attachment = NSTextAttachment()
attachment.image = UIImage(named: "yourIcon.png")
let attachmentString = NSAttributedString(attachment: attachment)
let myString = NSMutableAttributedString(string: price)
myString.append(attachmentString)
label.attributedText = myString
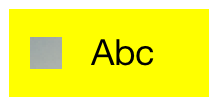
ваше эталонное изображение выглядит как кнопка. Попробуйте (также можно сделать в Interface Builder):
UIButton* button = [UIButton buttonWithType:UIButtonTypeCustom];
[button setFrame:CGRectMake(50, 50, 100, 44)];
[button setImage:[UIImage imageNamed:@"img"] forState:UIControlStateNormal];
[button setImageEdgeInsets:UIEdgeInsetsMake(0, -30, 0, 0)];
[button setTitle:@"Abc" forState:UIControlStateNormal];
[button setTitleColor:[UIColor blackColor] forState:UIControlStateNormal];
[button setBackgroundColor:[UIColor yellowColor]];
[view addSubview:button];
Swift 3 version
let attachment = NSTextAttachment()
attachment.image = UIImage(named: "plus")
attachment.bounds = CGRect(x: 0, y: 0, width: 10, height: 10)
let attachmentStr = NSAttributedString(attachment: attachment)
let myString = NSMutableAttributedString(string: "")
myString.append(attachmentStr)
let myString1 = NSMutableAttributedString(string: "My label text")
myString.append(myString1)
lbl.attributedText = myString
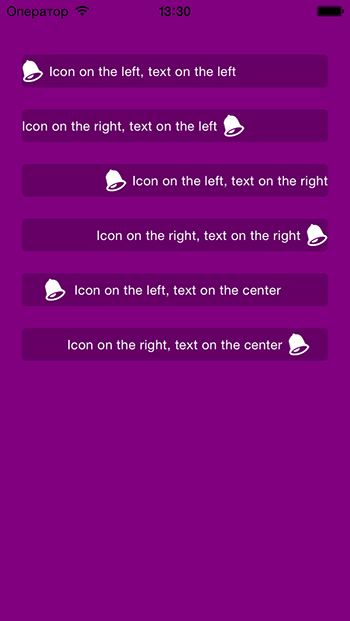
Я сделал реализацию этой функции в swift здесь:https://github.com/anatoliyv/SMIconLabel
код настолько прост, насколько это возможно:
var labelLeft = SMIconLabel(frame: CGRectMake(10, 10, view.frame.size.width - 20, 20))
labelLeft.text = "Icon on the left, text on the left"

// Here is the magic
labelLeft.icon = UIImage(named: "Bell") // Set icon image
labelLeft.iconPadding = 5               // Set padding between icon and label
labelLeft.numberOfLines = 0             // Required
labelLeft.iconPosition = SMIconLabelPosition.Left // Icon position
view.addSubview(labelLeft)
вот как это выглядит:
Swift 4
UIlabelрасширение для добавления изображения в метку со ссылкой на ответы вышеextension UILabel { func set(image: UIImage, with text: String) { let attachment = NSTextAttachment() attachment.image = image attachment.bounds = CGRect(x: 0, y: 0, width: 10, height: 10) let attachmentStr = NSAttributedString(attachment: attachment) let mutableAttributedString = NSMutableAttributedString() mutableAttributedString.append(attachmentStr) let textString = NSAttributedString(string: text, attributes: [.font: self.font]) mutableAttributedString.append(textString) self.attributedText = mutableAttributedString } }
версия Swift 2.0:
//Get image and set it's size
let image = UIImage(named: "imageNameWithHeart")
let newSize = CGSize(width: 10, height: 10)

//Resize image
UIGraphicsBeginImageContextWithOptions(newSize, false, 0.0)
image?.drawInRect(CGRectMake(0, 0, newSize.width, newSize.height))
let imageResized = UIGraphicsGetImageFromCurrentImageContext()
UIGraphicsEndImageContext()

//Create attachment text with image
var attachment = NSTextAttachment()
attachment.image = imageResized
var attachmentString = NSAttributedString(attachment: attachment)
var myString = NSMutableAttributedString(string: "I love swift ")
myString.appendAttributedString(attachmentString)
myLabel.attributedText = myString
попробуйте перетащить
UIViewна экране В IB. Оттуда вы можете перетащитьUIImageViewиUILabelв представление, которое вы только что создали. Установите изображениеUIImageViewв инспекторе свойств в качестве пользовательского изображения маркера (который вам нужно будет добавить в свой проект, перетащив его в панель навигации), и вы можете написать текст в метке.
попробуйте этот способ...
  self.lbl.text=@"Drawble Left";
    UIImageView *img=[[UIImageView alloc]initWithFrame:CGRectMake(0, 0, 20, 20)];
    img.image=[UIImage imageNamed:@"Star.png"];
    [self.lbl addSubview:img];
вы могли бы использовать UITextField С leftView свойства, а затем выберите
enabledсвойствоNOили использовать UIButton и
setImage:forControlState
В Swift 2.0,
мое решение проблемы-это сочетание нескольких ответов на этот вопрос. Проблема, с которой я столкнулся в ответе @Phil, заключалась в том, что я не мог изменить положение значка, и он всегда появлялся в правом углу. И один ответ от @anatoliy_v, я не мог изменить размер значка, который я хочу добавить к строке.
чтобы заставить его работать на меня, я сначала сделал
pod 'SMIconLabel'и затем создал эту функцию:func drawTextWithIcon(labelName: SMIconLabel, imageName: String, labelText: String!, width: Int, height: Int) { let newSize = CGSize(width: width, height: height) let image = UIImage(named: imageName) UIGraphicsBeginImageContextWithOptions(newSize, false, 0.0) image?.drawInRect(CGRectMake(0, 0, newSize.width, newSize.height)) let imageResized = UIGraphicsGetImageFromCurrentImageContext() UIGraphicsEndImageContext() labelName.text = " \(labelText)" labelName.icon = imageResized labelName.iconPosition = .Left }этот решение не только поможет вам разместить изображение, но и позволит внести необходимые изменения в размер значка и другие атрибуты.
Спасибо.
Swift 3 UILabel extention
Совет: Если вам нужно некоторое пространство между изображением и текстом, просто используйте пробел или два перед labelText.
extension UILabel {
    func addIconToLabel(imageName: String, labelText: String, bounds_x: Double, bounds_y: Double, boundsWidth: Double, boundsHeight: Double) {
        let attachment = NSTextAttachment()
        attachment.image = UIImage(named: imageName)
        attachment.bounds = CGRect(x: bounds_x, y: bounds_y, width: boundsWidth, height: boundsHeight)
        let attachmentStr = NSAttributedString(attachment: attachment)
        let string = NSMutableAttributedString(string: "")
        string.append(attachmentStr)
        let string2 = NSMutableAttributedString(string: labelText)
        string.append(string2)
        self.attributedText = string
    }
}
 func atributedLabel(str: String, img: UIImage)->NSMutableAttributedString
{   let iconsSize = CGRect(x: 0, y: -2, width: 16, height: 16)
    let attributedString = NSMutableAttributedString()
    let attachment = NSTextAttachment()
    attachment.image = img
    attachment.bounds = iconsSize
    attributedString.append(NSAttributedString(attachment: attachment))
    attributedString.append(NSAttributedString(string: str))

    return attributedString
}
вы можете использовать эту функцию для добавления изображений или мелких значков до метки
вы должны сделать пользовательский объект, где используется
UIViewа внутри вы ставитеUIImageViewиUILabel
Comments