Как сделать макет с видом заполнить оставшееся пространство?
Я разрабатываю свой пользовательский интерфейс приложения. Мне нужен макет выглядит так:
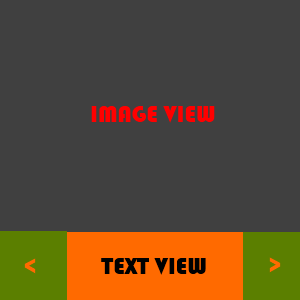
( кнопки). Проблема в том, что я не знаю, как убедиться, что TextView заполнит оставшееся пространство, с двумя кнопками фиксированного размера.
Если я использую fill_parent для просмотра текста, вторая кнопка ( > ) не может быть показана.
Как я могу создать макет, который выглядит как на картинке?
10 ответов:
ответ от woodshy работал для меня, и это проще, чем ответ от Ungureanu Liviu, так как он не использует
RelativeLayout. Я даю свой макет для ясности:<LinearLayout android:layout_width="fill_parent" android:layout_height="wrap_content" android:orientation="horizontal" > <Button android:layout_width = "80dp" android:layout_weight = "0" android:layout_height = "wrap_content" android:text="<"/> <TextView android:layout_width = "fill_parent" android:layout_height = "wrap_content" android:layout_weight = "1"/> <Button android:layout_width = "80dp" android:layout_weight = "0" android:layout_height = "wrap_content" android:text=">"/> </LinearLayout>
в случае, если помещается в LinearLayout, установите Layout_weight proprty of в 0 и 1 для TextView.
в случае, если уровень мельче выровнять , чтобы левая и правая и набор "макета налево" и "макет" право собственности TextView для идентификаторов
Если вы используете
RelativeLayout, вы можете сделать это что-то вроде этого:<RelativeLayout android:layout_width = "fill_parent" android:layout_height = "fill_parent"> <ImageView android:id = "@+id/my_image" android:layout_width = "wrap_content" android:layout_height = "wrap_content" android:layout_alignParentTop ="true" /> <RelativeLayout android:id="@+id/layout_bottom" android:layout_width="fill_parent" android:layout_height = "50dp" android:layout_alignParentBottom = "true"> <Button android:id = "@+id/but_left" android:layout_width = "80dp" android:layout_height = "wrap_content" android:text="<" android:layout_alignParentLeft = "true"/> <TextView android:layout_width = "fill_parent" android:layout_height = "wrap_content" android:layout_toLeftOf = "@+id/but_right" android:layout_toRightOf = "@id/but_left" /> <Button android:id = "@id/but_right" android:layout_width = "80dp" android:layout_height = "wrap_content" android:text=">" android:layout_alignParentRight = "true"/> </RelativeLayout> </RelativeLayout>
С помощью
ConstraintLayout, Я нашел что-то вроде<Button android:id="@+id/left_button" android:layout_width="80dp" android:layout_height="48dp" android:text="<" app:layout_constraintBottom_toBottomOf="parent" app:layout_constraintLeft_toLeftOf="parent" app:layout_constraintTop_toTopOf="parent" /> <TextView android:layout_width="0dp" android:layout_height="0dp" app:layout_constraintBottom_toBottomOf="parent" app:layout_constraintLeft_toRightOf="@+id/left_button" app:layout_constraintRight_toLeftOf="@+id/right_button" app:layout_constraintTop_toTopOf="parent" /> <Button android:id="@+id/right_button" android:layout_width="80dp" android:layout_height="48dp" android:text=">" app:layout_constraintBottom_toBottomOf="parent" app:layout_constraintRight_toRightOf="parent" app:layout_constraintTop_toTopOf="parent" />строительство. Ключ устанавливает ограничения правого, левого, верхнего и нижнего края соответствующим образом, а затем устанавливает ширину и высоту в
0dpи позволяя ему выяснить, что это собственный размер.
его простой Вы устанавливаете minWidth или minHeight, зависит от того, что вы ищете, по горизонтали или вертикали. И для другого объекта (тот, который вы хотите заполнить оставшееся пространство) вы устанавливаете вес 1 (Установите ширину, чтобы обернуть его содержимое), поэтому он заполнит остальную область.
<LinearLayout
        android:layout_width="wrap_content"
        android:layout_height="match_parent"
        android:layout_weight="1"
        android:gravity="center|left"
        android:orientation="vertical" >
</LinearLayout>
<LinearLayout
        android:layout_width="80dp"
        android:layout_height="fill_parent"
        android:minWidth="80dp" >
</LinearLayout>
можно использовать атрибут high layout_weight. Ниже вы можете увидеть макет, где ListView занимает все свободное пространство с кнопками внизу:
<LinearLayout xmlns:android="http://schemas.android.com/apk/res/android"
    xmlns:tools="http://schemas.android.com/tools"
    android:layout_width="fill_parent"
    android:layout_height="fill_parent"
    tools:context=".ConfigurationActivity"
    android:orientation="vertical"
    >

        <ListView
            android:id="@+id/listView"
            android:layout_width="fill_parent"
            android:layout_height="fill_parent"
            android:layout_weight="1000"
            />


        <Button
            android:id="@+id/btnCreateNewRule"
            android:layout_width="fill_parent"
            android:layout_height="wrap_content"
            android:layout_weight="1"
            android:text="Create New Rule" />


        <Button
            android:id="@+id/btnConfigureOk"
            android:layout_width="fill_parent"
            android:layout_height="wrap_content"
            android:layout_weight="1"
            android:text="Ok" />


</LinearLayout>
для тех, кто имеет тот же Глюк с
<LinearLayout...>как и я:важно указать
android:layout_width="fill_parent", он не будет работать сwrap_content.OTOH, вы можете опустить
android:layout_weight = "0", это не требуется.мой код в основном такой же, как код в https://stackoverflow.com/a/25781167/755804 (by Vivek Pandey)
вы должны избегать вложенности 2 относительного макета, так как относительный макет всегда делает 2 прохода для рисования (против 1 для любого другого типа макета). Он становится экспоненциальным, когда вы их вкладываете. Вы должны использовать линейную компоновку с шириной=0 и весом=1 на элементе, который вы хотите заполнить оставшееся пространство. Этот ответ лучше подходит для производительности и практики. Помните: используйте относительный макет только тогда, когда у вас нет другого выбора.
<?xml version="1.0" encoding="utf-8"?> <LinearLayout xmlns:android="http://schemas.android.com/apk/res/android" android:layout_width="match_parent" android:layout_height="match_parent" android:orientation="vertical"> <ImageView android:id="@+id/imageview" android:layout_width="wrap_content" android:layout_height="wrap_content" /> <LinearLayout android:layout_width="match_parent" android:layout_height="50dp" android:orientation="horizontal"> <Button android:id="@+id/prev_button" android:layout_width="80dp" android:layout_height="wrap_content" android:text="<" /> <TextView android:layout_width="0dp" android:layout_height="wrap_content" android:layout_weight="1" android:ellipsize="end" android:singleLine="true" android:gravity="center" android:text="TextView" /> <Button android:id="@+id/next_button" android:layout_width="80dp" android:layout_height="wrap_content" android:text=">" /> </LinearLayout> </LinearLayout>
вы можете использовать set the
layout_widthилиlayout_widthдо0dp(по ориентации вы хотите заполнить оставшееся пространство). Тогда используйтеlayout_weightчтобы заполнить оставшееся пространство.
используйте Relativelayout, чтобы обернуть LinearLayout
<RelativeLayout xmlns:android="http://schemas.android.com/apk/res/android" xmlns:round="http://schemas.android.com/apk/res-auto" xmlns:app="http://schemas.android.com/apk/res-auto" android:layout_width="match_parent" android:layout_height="match_parent"> <LinearLayout android:layout_width="fill_parent" android:layout_height="match_parent" android:orientation="vertical"> <Button android:layout_width = "wrap_content" android:layout_height = "wrap_content" android:text="<"/> <TextView android:layout_width = "fill_parent" android:layout_height = "wrap_content" android:layout_weight = "1"/> <Button android:layout_width = "wrap_content" android:layout_height = "wrap_content" android:text=">"/> </LinearLayout> </RelativeLayout>`
Comments