Как показать один макет поверх другого программно в моем случае?
мой основной макет главная.xml просто содержит два LinearLayouts:
- 1-й
LinearLayoutразмещенаVideoViewиButton, - 2-й
LinearLayoutразмещенаEditText, а этоLinearLayoutпоставил видимость значения "ушел" (android:visibility="gone")
, как показано ниже:
<LinearLayout xmlns:android="http://schemas.android.com/apk/res/android"

    android:layout_height="fill_parent"

    android:layout_width="fill_parent"

        android:orientation="vertical"

>

    <LinearLayout

        android:id="@+id/first_ll"

        android:layout_width="fill_parent"

        android:layout_height="wrap_content"

        android:orientation="horizontal"


    >

        <VideoView

            android:id="@+id/my_video"

            android:layout_width="wrap_content"

            android:layout_height="wrap_content"

            android:layout_weight="9"

        />


        <Button

            android:id="@+id/my_btn"

            android:layout_width="30dip"

            android:layout_height="30dip"

            android:layout_gravity="right|bottom"

                android:layout_weight="1"

        />


    </LinearLayout>


    <LinearLayout

        android:id="@+id/second_ll"

        android:layout_width="fill_parent"

        android:layout_height="wrap_content"

        android:paddingTop="2dip"


        android:visibility="gone"

    >

        <EditText

            android:id="@+id/edit_text_field"

            android:layout_height="40dip"

            android:layout_width="fill_parent"

            android:layout_weight="5"

            android:layout_gravity="center_vertical"

        />


    </LinearLayout>

</LinearLayout>
я успешно реализовал функцию, когда Button (с идентификатором my_btn) нажата, 2-йLinearLayout С EditText поле отображается, со следующим кодом Java:
LinearLayout secondLL = (LinearLayout) findViewById(R.id.second_ll);


Button myBtn = (Button) findViewById(R.id.my_btn);

myBtn.setOnClickListener(new OnClickListener(){

    @Override

    public void onClick(View v){

        int visibility = secondLL.getVisibility();


        if(visibility==View.GONE)

            secondLL.setVisibility(View.VISIBLE);


    }

});
с вышеуказанным кодом Java,2-йLinearLayout С EditText отображается как добавив ниже the 1-йLinearLayout в этом есть смысл.
но, что мне нужно: когда Button(id: my_btn) нажата,2-йLinearLayout С EditTextотображается поверх в 1-йLinearLayout, который выглядит как 2-йLinearLayout С EditText поднимается из нижней части экрана, и 2-йLinearLayout С EditText только занимают часть экрана снизу, это 1-й LinearLayout все еще виден, как показано на рисунке ниже:
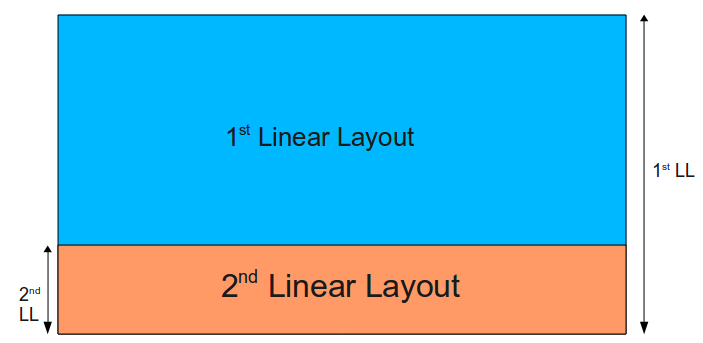
Итак, когда Button(id: my_btn) нажимается как показать 2-йLinearLayout С EditTextна в 1-йLinearLayout вместо добавления 2-йLinearLayout ниже 1-йLinearLayout программно?
3 ответов:
используйте FrameLayout с двумя детьми. Эти два ребенка будут перекрываться. Это рекомендуется в одном из учебников с Android на самом деле, это не хак...
вот пример, где TextView отображается поверх ImageView:
<FrameLayout xmlns:android="http://schemas.android.com/apk/res/android"
  android:layout_width="fill_parent"
  android:layout_height="fill_parent">

  <ImageView
    android:layout_width="fill_parent"
    android:layout_height="fill_parent"

    android:scaleType="center"
    android:src="@drawable/golden_gate" />

  <TextView
    android:layout_width="wrap_content"
    android:layout_height="wrap_content"
    android:layout_marginBottom="20dip"
    android:layout_gravity="center_horizontal|bottom"

    android:padding="12dip"

    android:background="#AA000000"
    android:textColor="#ffffffff"

    android:text="Golden Gate" />

</FrameLayout>

ответ, данный Александру, работает довольно хорошо. По его словам, важно, что этот "аксессор"-вид добавляется как последний элемент. Вот код, который сделал трюк для меня:
        ...

        ...

            </LinearLayout>

        </LinearLayout>

    </FrameLayout>

</LinearLayout>

<!-- place a FrameLayout (match_parent) as the last child -->
<FrameLayout
    android:id="@+id/icon_frame_container"
    android:layout_width="match_parent"
    android:layout_height="match_parent">
</FrameLayout>

</TabHost>
в Java:
final MaterialDialog materialDialog = (MaterialDialog) dialogInterface;

FrameLayout frameLayout = (FrameLayout) materialDialog
        .findViewById(R.id.icon_frame_container);

frameLayout.setOnTouchListener(
        new OnSwipeTouchListener(ShowCardActivity.this) {
FrameLayoutэто не лучший способ сделать это:использовать
RelativeLayoutвместо. Вы можете разместить элементы в любом месте вам нравится. Элемент, который приходит после, имеет более высокий Z-индекс, чем предыдущий (т. е. он приходит над предыдущим).пример:
<?xml version="1.0" encoding="utf-8"?>
<RelativeLayout xmlns:android="http://schemas.android.com/apk/res/android"
    xmlns:app="http://schemas.android.com/apk/res-auto"
    android:layout_width="match_parent" android:layout_height="match_parent">
    <ImageView
        android:layout_width="match_parent"
        android:layout_height="match_parent"
        android:background="@color/colorPrimary"
        app:srcCompat="@drawable/ic_information"/>

    <TextView
        android:layout_width="wrap_content"
        android:layout_height="wrap_content"
        android:text="This is a text."
        android:layout_centerHorizontal="true"
        android:layout_alignParentBottom="true"
        android:layout_margin="8dp"
        android:padding="5dp"
        android:textAppearance="?android:attr/textAppearanceLarge"
        android:background="#A000"
        android:textColor="@android:color/white"/>
</RelativeLayout>

Comments