Как бы я создал UIAlertView в Swift?
Я работал над созданием UIAlertView в Swift, но по какой-то причине я не могу получить правильный оператор, потому что я получаю эту ошибку:
не удалось найти перегрузку для 'init', которая принимает поставляемый
аргументы
вот как я это написал:
let button2Alert: UIAlertView = UIAlertView(title: "Title", message: "message",

                     delegate: self, cancelButtonTitle: "OK", otherButtonTitles: nil)
затем, чтобы назвать его я использую:
button2Alert.show()
На данный момент это сбой, и я просто не могу правильно понять синтаксис.
30 ответов:
С
UIAlertViewкласс:// UIAlertView является устаревшим. Используйте UIAlertController С a preferredStyle из UIAlertControllerStyleAlert вместо
на iOS 8, вы можете сделать это:
let alert = UIAlertController(title: "Alert", message: "Message", preferredStyle: UIAlertControllerStyle.Alert)
alert.addAction(UIAlertAction(title: "Click", style: UIAlertActionStyle.Default, handler: nil))
self.presentViewController(alert, animated: true, completion: nil)
теперь
UIAlertController- Это один класс для создания и взаимодействия с тем, что мы знали какUIAlertViews иUIActionSheets на iOS 8.Edit: для обработки действий:
alert.addAction(UIAlertAction(title: "OK", style: .Default, handler: { action in
    switch action.style{
    case .Default:
        print("default")

    case .Cancel:
        print("cancel")

    case .Destructive:
        print("destructive")
    }
}}))
"редактировать" Swift 3:
let alert = UIAlertController(title: "Alert", message: "Message", preferredStyle: UIAlertControllerStyle.alert)
alert.addAction(UIAlertAction(title: "Click", style: UIAlertActionStyle.default, handler: nil))
self.present(alert, animated: true, completion: nil)
редактировать для Swift 4:
let alert = UIAlertController(title: "Alert", message: "Message", preferredStyle: UIAlertControllerStyle.alert)
alert.addAction(UIAlertAction(title: "OK", style: .default, handler: { action in
      switch action.style{
      case .default:
            print("default")

      case .cancel:
            print("cancel")

      case .destructive:
            print("destructive")


}}))
self.present(alert, animated: true, completion: nil)
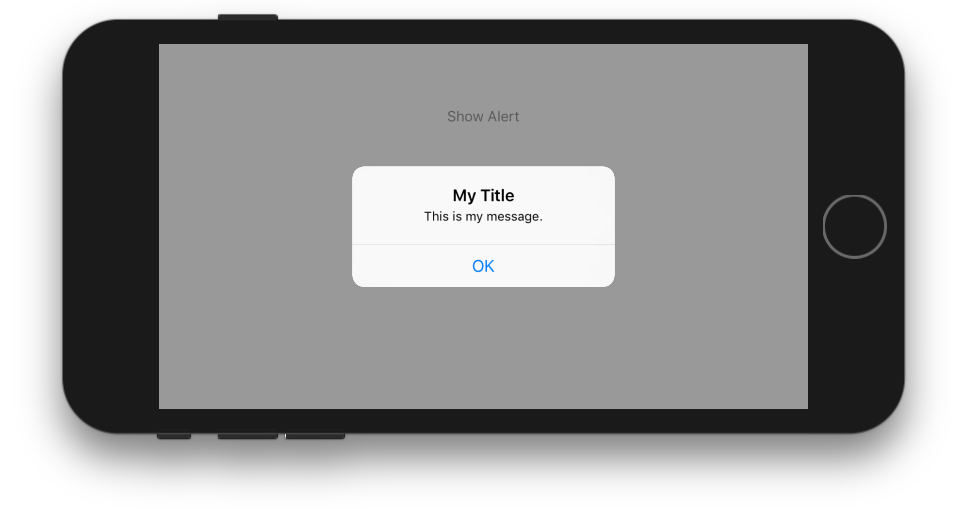
Одна Кнопка
class ViewController: UIViewController {

    @IBAction func showAlertButtonTapped(_ sender: UIButton) {

        // create the alert
        let alert = UIAlertController(title: "My Title", message: "This is my message.", preferredStyle: UIAlertController.Style.alert)

        // add an action (button)
        alert.addAction(UIAlertAction(title: "OK", style: UIAlertAction.Style.default, handler: nil))

        // show the alert
        self.present(alert, animated: true, completion: nil)
    }
}
Две Кнопки
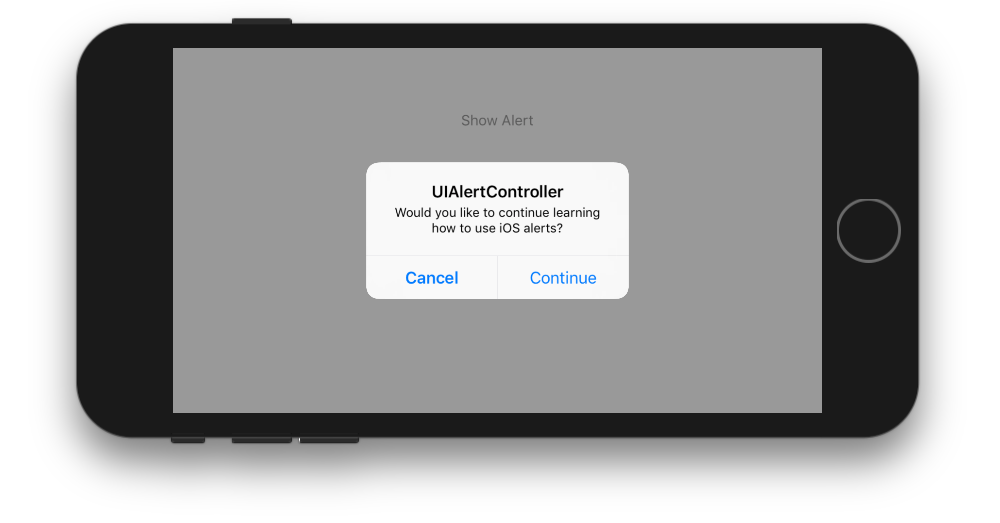
class ViewController: UIViewController {

    @IBAction func showAlertButtonTapped(_ sender: UIButton) {

        // create the alert
        let alert = UIAlertController(title: "UIAlertController", message: "Would you like to continue learning how to use iOS alerts?", preferredStyle: UIAlertController.Style.alert)

        // add the actions (buttons)
        alert.addAction(UIAlertAction(title: "Continue", style: UIAlertAction.Style.default, handler: nil))
        alert.addAction(UIAlertAction(title: "Cancel", style: UIAlertAction.Style.cancel, handler: nil))

        // show the alert
        self.present(alert, animated: true, completion: nil)
    }
}
Три Кнопки
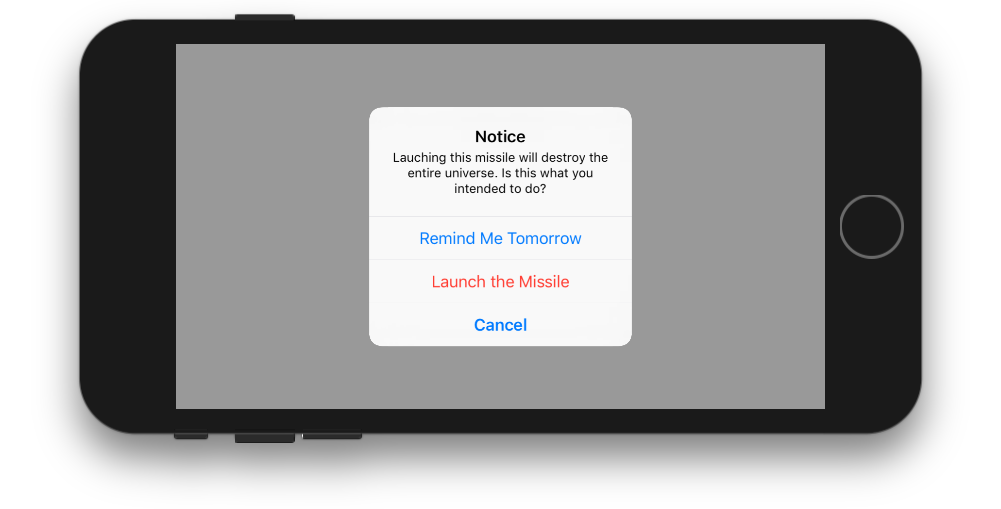
class ViewController: UIViewController {

    @IBAction func showAlertButtonTapped(_ sender: UIButton) {

        // create the alert
        let alert = UIAlertController(title: "Notice", message: "Lauching this missile will destroy the entire universe. Is this what you intended to do?", preferredStyle: UIAlertController.Style.alert)

        // add the actions (buttons)
        alert.addAction(UIAlertAction(title: "Remind Me Tomorrow", style: UIAlertAction.Style.default, handler: nil))
        alert.addAction(UIAlertAction(title: "Cancel", style: UIAlertActio.nStyle.cancel, handler: nil))
        alert.addAction(UIAlertAction(title: "Launch the Missile", style: UIAlertAction.Style.destructive, handler: nil))

        // show the alert
        self.present(alert, animated: true, completion: nil)
    }
}
Обработка Нажатий Кнопок
The
handlerбылnilв приведенных выше примерах. Вы можете заменитьnilС закрытие чтобы сделать что-то, когда пользователь нажимает кнопку. Для пример:alert.addAction(UIAlertAction(title: "Launch the Missile", style: UIAlertAction.Style.destructive, handler: { action in // do something like... self.launchMissile() }))Примечания
- несколько кнопок не обязательно должны использовать разные
UIAlertAction.Styleтипы. Они все могут быть.default.- для более чем трех кнопок рассмотрите возможность использования листа действий. Настройка очень похожа. вот пример.
вы можете создать UIAlert с помощью стандартного конструктора, но "наследие", кажется, не работает:
let alert = UIAlertView()
alert.title = "Alert"
alert.message = "Here's a message"
alert.addButtonWithTitle("Understood")
alert.show()
щелчок зрения
@IBAction func testClick(sender: UIButton) {

  var uiAlert = UIAlertController(title: "Title", message: "Message", preferredStyle: UIAlertControllerStyle.Alert)
  self.presentViewController(uiAlert, animated: true, completion: nil)

  uiAlert.addAction(UIAlertAction(title: "Ok", style: .Default, handler: { action in
   println("Click of default button")
  }))

  uiAlert.addAction(UIAlertAction(title: "Cancel", style: .Cancel, handler: { action in
   println("Click of cancel button")
  }))

}
сделано с двумя кнопками OK & Cancel
Если вы нацелены на iOS 7 и 8, вам нужно что-то вроде этого, чтобы убедиться, что вы используете правильный метод для каждой версии, потому что
UIAlertViewустарел в iOS 8, ноUIAlertControllerнедоступно в iOS 7:func alert(title: String, message: String) { if let getModernAlert: AnyClass = NSClassFromString("UIAlertController") { // iOS 8 let myAlert: UIAlertController = UIAlertController(title: title, message: message, preferredStyle: .Alert) myAlert.addAction(UIAlertAction(title: "OK", style: .Default, handler: nil)) self.presentViewController(myAlert, animated: true, completion: nil) } else { // iOS 7 let alert: UIAlertView = UIAlertView() alert.delegate = self alert.title = title alert.message = message alert.addButtonWithTitle("OK") alert.show() } }
показать UIAlertView на языке swift: -
Протокол UIAlertViewDelegate
let alert = UIAlertView(title: "alertView", message: "This is alertView", delegate:self, cancelButtonTitle:"Cancel", otherButtonTitles: "Done", "Delete")
alert.show()
показать UIAlertViewController на языке swift: -
let alert = UIAlertController(title: "Error", message: "Enter data in Text fields", preferredStyle: UIAlertControllerStyle.Alert)
alert.addAction(UIAlertAction(title: "OK", style: UIAlertActionStyle.Default, handler: nil))
self.presentViewController(alert, animated: true, completion: nil)
просто не предоставляйте другие названия кнопок в конструкторе.
let alertView = UIAlertView(title: "Oops!", message: "Something
happened...", delegate: nil, cancelButtonTitle: "OK")

alertView.show()
но я согласен с Оскаром, этот класс устарел в iOS 8, поэтому не будет никакого использования UIAlertView, если вы делаете приложение только для iOS 8. В противном случае код выше будет работать.
с расширениями протокола Swift 2, Вы можете сделать протокол, который обеспечивает реализацию по умолчанию для ваших контроллеров представления:
ShowsAlert.Свифт
import UIKit

protocol ShowsAlert {}

extension ShowsAlert where Self: UIViewController {
    func showAlert(title: String = "Error", message: String) {
        let alertController = UIAlertController(title: title, message: message, preferredStyle: .Alert)
        alertController.addAction(UIAlertAction(title: "Ok", style: .Default, handler: nil))
        presentViewController(alertController, animated: true, completion: nil)
    }
}
ViewController.Свифт
class ViewController: UIViewController, ShowsAlert {
    override func viewDidLoad() {
        super.viewDidLoad()
        showAlert(message: "Hey there, I am an error message!")
    }
}
Я нашел это,
var alertView = UIAlertView();
alertView.addButtonWithTitle("Ok");
alertView.title = "title";
alertView.message = "message";
alertView.show();
не плохо, но это работает :)
обновление:
но я нашел в заголовочном файле так:
extension UIAlertView {
    convenience init(title: String, message: String, delegate: UIAlertViewDelegate?, cancelButtonTitle: String?, otherButtonTitles firstButtonTitle: String, _ moreButtonTitles: String...)
}
кто-то может объяснить это.
на SWIFT4, Я думаю, расширяя
UIViewControllerи создание многоразового управления подтверждением является самым элегантным способом.вы можете продлить
UIViewControllerкак показано ниже:extension UIViewController { func AskConfirmation (title:String, message:String, completion:@escaping (_ result:Bool) -> Void) { let alert = UIAlertController(title: title, message: message, preferredStyle: UIAlertControllerStyle.alert) self.present(alert, animated: true, completion: nil) alert.addAction(UIAlertAction(title: "Ok", style: .default, handler: { action in completion(true) })) alert.addAction(UIAlertAction(title: "Cancel", style: .cancel, handler: { action in completion(false) })) } }затем вы можете использовать его в любое время:
 AskConfirmation(title: "YOUR MESSAGE TITLE", message: "YOUR MESSAGE") { (result) in
        if result { //User has clicked on Ok

        } else { //User has clicked on Cancel

        }
    }
    class Preview: UIViewController , UIAlertViewDelegate
    {
        @IBAction func MoreBtnClicked(sender: AnyObject)
        {
            var moreAlert=UIAlertView(title: "Photo", message: "", delegate: self, cancelButtonTitle: "No Thanks!", otherButtonTitles: "Save Image", "Email", "Facebook", "Whatsapp" )
            moreAlert.show()
            moreAlert.tag=111;
        }

        func alertView(alertView: UIAlertView, didDismissWithButtonIndex buttonIndex: Int)
        {
            if alertView.tag==111
            {
                if buttonIndex==0
                {
                    println("No Thanks!")
                }
                else if buttonIndex==1
                {
                    println("Save Image")
                }
                else if buttonIndex == 2
                {
                    println("Email")
                }
                else if buttonIndex == 3
                {
                    println("Facebook")
                }
                else if buttonIndex == 4
                {
                    println("Whatsapp")
                }
            }
        }
    }
У меня есть еще один трюк. Предположим, у вас есть 5 классов, в которых необходимо применить предупреждение о выходе из системы. Попробуйте с расширением класса swift.
File-New-Swift class - назовите его.
добавить следующее:
public extension UIViewController
{

    func makeLogOutAlert()
    {
        var refreshAlert = UIAlertController(title: "Log Out", message: "Are You Sure to Log Out ? ", preferredStyle: UIAlertControllerStyle.Alert)

        refreshAlert.addAction(UIAlertAction(title: "Confirm", style: .Default, handler: { (action: UIAlertAction!) in
            self.navigationController?.popToRootViewControllerAnimated(true)
        }))

        refreshAlert.addAction(UIAlertAction(title: "Cancel", style: .Default, handler: { (action: UIAlertAction!) in
            refreshAlert .dismissViewControllerAnimated(true, completion: nil)
        }))

        presentViewController(refreshAlert, animated: true, completion: nil)
    }
}
реализовать с помощью: self.makeLogOutAlert (). Надеюсь, это поможет.
Я сделал одноэлементный класс, чтобы сделать это удобно использовать из любого места в вашем приложении:https://github.com/Swinny1989/Swift-Popups
Вы можете создать всплывающее окно с несколькими кнопками, как это:
Popups.SharedInstance.ShowAlert(self, title: "Title goes here", message: "Messages goes here", buttons: ["button one" , "button two"]) { (buttonPressed) -> Void in
    if buttonPressed == "button one" {
      //Code here
    } else if buttonPressed == "button two" {
        // Code here
    }
}
или всплывающие окна с одной кнопкой такой:
Popups.SharedInstance.ShowPopup("Title goes here", message: "Message goes here.")
Swift 3
ниже приведен простой пример того, как создать простое оповещение с помощью одной кнопки с помощью Swift 3.
let alert = UIAlertController(title: "Title",
                              message: "Message",
                              preferredStyle: .alert)
alert.addAction(UIAlertAction(title: "Ok", style: .default))
present(alert, animated: true)
в приведенном выше примере обратный вызов дескриптора действия был опущен, потому что поведение по умолчанию представления предупреждения с одной кнопкой должно исчезнуть при нажатии кнопки.
вот как создать другое действие, которое можно было бы добавить в оповещение с помощью "alert.addAction(действий)". Различные стили .неисполнение. ,разрушительный и. отмена.
let action = UIAlertAction(title: "Ok", style: .default) { action in
    // Handle when button is clicked
}
в Swift 4.1 и Xcode 9.4.1
ПРОСТОЕ ПРЕДУПРЕЖДЕНИЕ
let alert = UIAlertController(title: ""Your title, message: "Your message", preferredStyle: .alert)

     let ok = UIAlertAction(title: "OK", style: .default, handler: { action in
     })
     alert.addAction(ok)
     let cancel = UIAlertAction(title: "Cancel", style: .default, handler: { action in
     })
     alert.addAction(cancel)
     DispatchQueue.main.async(execute: {
        self.present(alert, animated: true)
})
ОПОВЕЩЕНИЕ С ОБЩИМ КЛАССОМ
если вы хотите, чтобы общий стиль класса(написать один раз, использовать везде)
import UIKit
class SharedClass: NSObject {//This is shared class
static let sharedInstance = SharedClass()

    //Show alert
    func alert(view: UIViewController, title: String, message: String) {
        let alert = UIAlertController(title: title, message: message, preferredStyle: .alert)
        let defaultAction = UIAlertAction(title: "OK", style: .default, handler: { action in
        })
        alert.addAction(defaultAction)
        DispatchQueue.main.async(execute: {
            view.present(alert, animated: true)
        })
    }

    private override init() {
    }
}
теперь вызовите предупреждение, как это в каждом изделии
SharedClass.SharedInstance.alert(view: self, title: "Your title here", message: "Your message here")ПРИСУТСТВУЕТ ПРЕДУПРЕЖДЕНИЕ СВЕРХУ ВСЕХ ОКОН
если вы хотите представить предупреждение поверх всех представлений, используйте этот код
func alertWindow(title: String, message: String) {
    DispatchQueue.main.async(execute: {
        let alertWindow = UIWindow(frame: UIScreen.main.bounds)
        alertWindow.rootViewController = UIViewController()
        alertWindow.windowLevel = UIWindowLevelAlert + 1

        let alert2 = UIAlertController(title: title, message: message, preferredStyle: .alert)
        let defaultAction2 = UIAlertAction(title: "OK", style: .default, handler: { action in
        })
        alert2.addAction(defaultAction2)

        alertWindow.makeKeyAndVisible()

        alertWindow.rootViewController?.present(alert2, animated: true, completion: nil)
    })
}
Я получил следующее
UIAlertViewкод инициализации для компиляции без ошибок (я думаю, что последняя, вариативная часть, возможно, сложна). Но я должен был убедиться, что классself(который я передаю как делегат) принималUIAlertViewDelegateпротокол для ошибок компиляции, чтобы уйти:let alertView = UIAlertView( title: "My Title", message: "My Message", delegate: self, cancelButtonTitle: "Cancel", otherButtonTitles: "OK" )кстати, это ошибка, которую я получал (начиная с Xcode 6.4):
не удается найти инициализатор для типа 'UIAlertView', который принимает список аргументов типа '(название: строка, сообщение: строка, делегат: MyViewController, cancelButtonTitle: String, otherButtonTitles: Строка)'
как уже упоминалось, вы должны перейти на UIAlertController, если вы можете настроить iOS 8.икс.+ Для поддержки iOS 7 Используйте приведенный выше код (iOS 6 Не поддерживается Swift).
причина, по которой он не работает, потому что некоторое значение, которое вы передали функции, неверно. swift не любит Objective-C, вы можете поставить ноль аргументов, которые являются типом класса без каких-либо ограничений(может быть). Аргумент otherButtonTitles определяется как необязательный, который его тип не имеет (?)на конце. поэтому вы должны передать ему конкретное значение.
@IBAction func Alert(sender: UIButton) {

    var alertView:UIAlertView = UIAlertView()
    alertView.title = "Alert!"
    alertView.message = "Message"
    alertView.delegate = self
    alertView.addButtonWithTitle("OK")

    alertView.show()

}
попробуй такое
используйте этот код для отображения alertview
  let alertController = UIAlertController(title: "Hello  Coders", message: "your alert message", preferredStyle: .Alert)
        let defaultAction = UIAlertAction(title: "Close Alert", style: .Default, handler: nil)
        alertController.addAction(defaultAction)

        presentViewController(alertController, animated: true, completion: nil)
ссылки: Swift показать предупреждение с помощью UIAlertController
в xcode 9
let alert = UIAlertController(title: "Alert", message: "message", preferredStyle: UIAlertControllerStyle.alert)
alert.addAction(UIAlertAction(title: "Ok", style: UIAlertActionStyle.default, handler: nil))
self.present(alert, animated: true, completion: nil)
 let alertController = UIAlertController(title: "Select Photo", message: "Select atleast one photo", preferredStyle: .alert)
    let action1 = UIAlertAction(title: "From Photo", style: .default) { (action) in
        print("Default is pressed.....")
    }
    let action2 = UIAlertAction(title: "Cancel", style: .cancel) { (action) in
        print("Cancel is pressed......")
    }
    let action3 = UIAlertAction(title: "Click new", style: .default) { (action) in
        print("Destructive is pressed....")

    }
    alertController.addAction(action1)
    alertController.addAction(action2)
    alertController.addAction(action3)
    self.present(alertController, animated: true, completion: nil)

}
SWIFT 4: просто создайте расширение для UIViewController следующим образом:
   extension  UIViewController{

   func showSucsessAlert(withTitle title: String, andMessage
    message:String){
        let alert = UIAlertController(title: title, message: message,
         preferredStyle: UIAlertControllerStyle.alert)
        alert.addAction(UIAlertAction(title: "OK", style:
        UIAlertActionStyle.default, handler: nil))
        self.present(alert, animated: true, completion: nil)
         }
    }
теперь в вашем viewcontroller, непосредственно вызовите функцию выше, как если бы они были предоставлены UIViewController.
    yourViewController.showSucsessAlert(withTitle:
      "YourTitle", andMessage: "YourCustomTitle")
попробуйте это. Положите Ниже Код В Кнопку.
let alert = UIAlertController(title: "Your_Title_Text", message: "Your_MSG", preferredStyle: UIAlertControllerStyle.alert)
alert.addAction(UIAlertAction(title: "Your_Text", style: UIAlertActionStyle.default, handler: nil))
self.present(alert, animated:true, completion: nil)
вот забавный пример в Swift:
private func presentRandomJoke() {
  if let randomJoke: String = jokesController.randomJoke() {
    let alertController: UIAlertController = UIAlertController(title:nil, message:randomJoke, preferredStyle: UIAlertControllerStyle.Alert)
    alertController.addAction(UIAlertAction(title:"Done", style:UIAlertActionStyle.Default, handler:nil))
    presentViewController(alertController, animated:true, completion:nil)
  }
}
вот довольно простая функция AlertView в Swift:
class func globalAlertYesNo(msg: String) {
        let alertView = UNAlertView(title: "Title", message: msg)

        alertView.messageAlignment = NSTextAlignment.Center
        alertView.buttonAlignment  = UNButtonAlignment.Horizontal

        alertView.addButton("Yes", action: {

            print("Yes action")

        })

        alertView.addButton("No", action: {

            print("No action")

        })

        alertView.show()

    }
вы должны передать сообщение в виде строки, где вы используете эту функцию.
Старый Способ: UIAlertView
let alertView = UIAlertView(title: "Default Style", message: "A standard alert.", delegate: self, cancelButtonTitle: "Cancel", otherButtonTitles: "OK")
alertView.alertViewStyle = .Default
alertView.show()

// MARK: UIAlertViewDelegate

 func alertView(alertView: UIAlertView, clickedButtonAtIndex buttonIndex: Int) {
 switch buttonIndex {

    // ...
   }
  }
Новый Способ: UIAlertController
let alertController = UIAlertController(title: "Default Style", message: "A standard alert.", preferredStyle: .Alert)

let cancelAction = UIAlertAction(title: "Cancel", style: .Cancel) { (action) in
// ...
 }
 alertController.addAction(cancelAction)

 let OKAction = UIAlertAction(title: "OK", style: .Default) { (action) in
// ...
 }
 alertController.addAction(OKAction)
 self.presentViewController(alertController, animated: true) {
 // ...
}
на IOS 9, вы можете сделать это
let alert = UIAlertController(title: "Alert", message: "Message", preferredStyle: UIAlertControllerStyle.alert)
alert.addAction(UIAlertAction(title: "Click", style: UIAlertActionStyle.default, handler: nil))
self.present(alert, animated: true, completion: nil)
// Универсальный Класс Для UIAlertView
//MARK:- MODULES
import Foundation
import UIKit

//MARK:- CLASS
class Alert  : NSObject{

static let shared = Alert()

var okAction : AlertSuccess?
typealias AlertSuccess = (()->())?
var alert: UIAlertController?

/** show */
public func show(title : String?, message : String?, viewController : UIViewController?, okAction : AlertSuccess = nil) {

    let version : NSString = UIDevice.current.systemVersion as NSString
    if  version.doubleValue >= 8 {
        alert = UIAlertController(title: title, message: message, preferredStyle:.alert)
        alert?.addAction(UIAlertAction(title: "OK", style: .default, handler: { (action: UIAlertAction) in

            if let okAction = okAction {
                okAction()
            }
        }))
        viewController?.present(alert ?? UIAlertController(), animated:true, completion:nil);
    }
}

/** showWithCancelAndOk */
public func showWithCancelAndOk(title : String, okTitle : String, cancelTitle : String, message : String, viewController : UIViewController?, okAction : AlertSuccess = nil, cancelAction : AlertSuccess = nil) {
    let version:NSString = UIDevice.current.systemVersion as NSString;

    if  version.doubleValue >= 8 {
        alert = UIAlertController(title: title, message: message, preferredStyle:.alert)

        alert?.addAction(UIAlertAction(title: cancelTitle, style: .default, handler: { (action: UIAlertAction) in

            if let cancelAction = cancelAction {
                cancelAction()
            }
        }))
        alert?.addAction(UIAlertAction(title: okTitle, style: .default, handler: { (action: UIAlertAction) in

            if let okAction = okAction {
                okAction()
            }
        }))
        viewController?.present(alert!, animated:true, completion:nil);
    }
}

/** showWithTimer */
public func showWithTimer(message : String?, viewController : UIViewController?) {

    let version : NSString = UIDevice.current.systemVersion as NSString
    if  version.doubleValue >= 8 {
        alert = UIAlertController(title: "", message: message, preferredStyle:.alert)
        viewController?.present(alert ?? UIAlertController(), animated:true, completion:nil)
        let when = DispatchTime.now() + 1
        DispatchQueue.main.asyncAfter(deadline: when){
            self.alert?.dismiss(animated: true, completion: nil)
        }
    }
}
}
использовать:-
Alert.shared.show(title: "No Internet Connection", message: "The internet connection appers to be offline.", viewController: self) //without ok action

Alert.shared.show(title: "No Internet Connection", message: "The internet connection appers to be offline.", viewController: self, okAction: {
                            //ok action
                        }) // with ok action

Alert.shared.show(title: "No Internet Connection", message: "The internet connection appers to be offline.", viewController: self, okAction: {
                            //ok action
}, cancelAction: {
 //cancel action
}) //with cancel and ok action

Alert.shared.showWithTimer(message : "This is an alert with timer", viewController : self) //with timer
  // UIAlertView is deprecated. Use UIAlertController
  // title = title of the alert view.
  // message = Alert message you want to show.
  // By tap on "OK" , Alert view will dismiss.

 UIAlertView(title: "Alert", message: "Enter Message here.", delegate: nil, cancelButtonTitle: "OK").show()
Ниже приведен многоразовый код для просмотра предупреждений и лист действий, просто напишите одну строку, чтобы показать предупреждение в любом месте приложения
class AlertView{

    static func show(title:String? = nil,message:String?,preferredStyle: UIAlertControllerStyle = .alert,buttons:[String] = ["Ok"],completionHandler:@escaping (String)->Void){
        let alert = UIAlertController(title: title, message: message, preferredStyle: preferredStyle)

        for button in buttons{

            var style = UIAlertActionStyle.default
            let buttonText = button.lowercased().replacingOccurrences(of: " ", with: "")
            if buttonText == "cancel"{
                style = .cancel
            }
            let action = UIAlertAction(title: button, style: style) { (_) in
                completionHandler(button)
            }
            alert.addAction(action)
        }

        DispatchQueue.main.async {
            if let app = UIApplication.shared.delegate as? AppDelegate, let rootViewController = app.window?.rootViewController {
                rootViewController.present(alert, animated: true, completion: nil)
            }

        }
    }
}
использование :
class ViewController: UIViewController {

    override func viewWillAppear(_ animated: Bool) {
        AlertView.show(title: "Alert", message: "Are you sure ?", preferredStyle: .alert, buttons: ["Yes","No"]) { (button) in
            print(button)
        }
    }

}
Comments