4 ответов:
звучит как хорошая возможность использовать AlertDialog.
как кажется, Android не имеет встроенного диалога для этого (насколько я знаю). К счастью, это всего лишь небольшая дополнительная работа над созданием стандартного AlertDialog. Вам просто нужно создать EditText для пользователя для ввода данных и установить его в качестве представления AlertDialog. Вы можете настроить тип ввода, разрешенный с помощью setInputType, если вы необходимость.
Если вы можете использовать переменную-член, Вы можете просто установить переменную в значение EditText, и она будет сохраняться после того, как диалоговое окно будет отклонено. Если вы не можете использовать переменную-член, Вам может потребоваться использовать прослушиватель для отправки строкового значения в нужное место. (Я могу редактировать и уточнять больше, если это то, что вам нужно).
в свой класс:
private String m_Text = "";в OnClickListener вашей кнопки (или в функции, вызываемой из там):
AlertDialog.Builder builder = new AlertDialog.Builder(this);
builder.setTitle("Title");

// Set up the input
final EditText input = new EditText(this);
// Specify the type of input expected; this, for example, sets the input as a password, and will mask the text
input.setInputType(InputType.TYPE_CLASS_TEXT | InputType.TYPE_TEXT_VARIATION_PASSWORD);
builder.setView(input);

// Set up the buttons
builder.setPositiveButton("OK", new DialogInterface.OnClickListener() {
    @Override
    public void onClick(DialogInterface dialog, int which) {
        m_Text = input.getText().toString();
    }
});
builder.setNegativeButton("Cancel", new DialogInterface.OnClickListener() {
    @Override
    public void onClick(DialogInterface dialog, int which) {
        dialog.cancel();
    }
});

builder.show();
Я буду обновлять @Aaron update с подходом, который даст вам возможность стилизовать диалог лучше. Вот скорректированный пример:
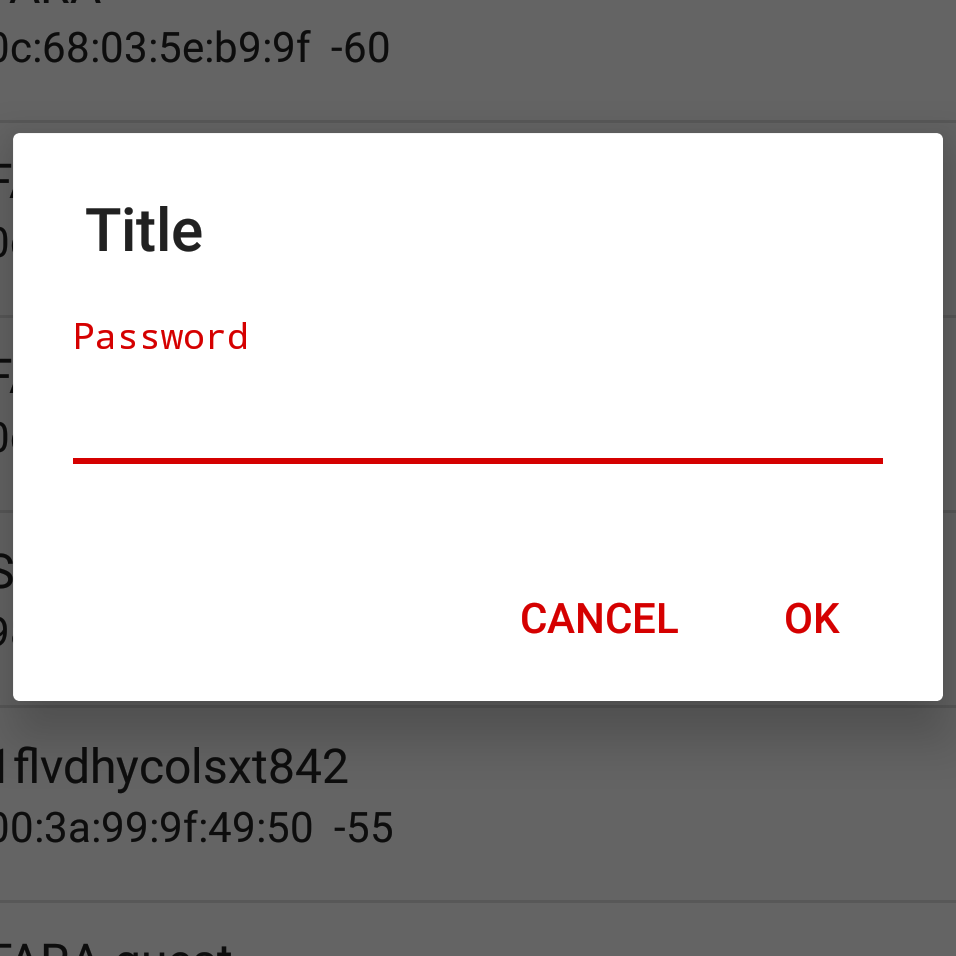
AlertDialog.Builder builder = new AlertDialog.Builder(getContext());
builder.setTitle("Title");
// I'm using fragment here so I'm using getView() to provide ViewGroup
// but you can provide here any other instance of ViewGroup from your Fragment / Activity
View viewInflated = LayoutInflater.from(getContext()).inflate(R.layout.text_inpu_password, (ViewGroup) getView(), false);
// Set up the input
final EditText input = (EditText) viewInflated.findViewById(R.id.input);
// Specify the type of input expected; this, for example, sets the input as a password, and will mask the text
builder.setView(viewInflated);

// Set up the buttons
builder.setPositiveButton(android.R.string.ok, new DialogInterface.OnClickListener() {
    @Override
    public void onClick(DialogInterface dialog, int which) {
        dialog.dismiss();
        m_Text = input.getText().toString();
    }
});
builder.setNegativeButton(android.R.string.cancel, new DialogInterface.OnClickListener() {
    @Override
    public void onClick(DialogInterface dialog, int which) {
        dialog.cancel();
    }
});

builder.show();
вот пример макета, который был использован для создания диалогового окна EditText:
<?xml version="1.0" encoding="utf-8"?>
<FrameLayout xmlns:android="http://schemas.android.com/apk/res/android"
    android:layout_width="match_parent"
    android:layout_height="wrap_content"
    android:padding="@dimen/content_padding_normal">

    <android.support.design.widget.TextInputLayout
        android:layout_width="match_parent"
        android:layout_height="wrap_content">

        <AutoCompleteTextView
            android:id="@+id/input"
            android:layout_width="match_parent"
            android:layout_height="wrap_content"
            android:hint="@string/hint_password"
            android:imeOptions="actionDone"
            android:inputType="textPassword" />

    </android.support.design.widget.TextInputLayout>
</FrameLayout>
здесь вы можете найти результат:
Как насчет этого пример? Кажется, все просто.
final EditText txtUrl = new EditText(this);

// Set the default text to a link of the Queen
txtUrl.setHint("http://www.librarising.com/astrology/celebs/images2/QR/queenelizabethii.jpg");

new AlertDialog.Builder(this)
  .setTitle("Moustachify Link")
  .setMessage("Paste in the link of an image to moustachify!")
  .setView(txtUrl)
  .setPositiveButton("Moustachify", new DialogInterface.OnClickListener() {
    public void onClick(DialogInterface dialog, int whichButton) {
      String url = txtUrl.getText().toString();
      moustachify(null, url);
    }
  })
  .setNegativeButton("Cancel", new DialogInterface.OnClickListener() {
    public void onClick(DialogInterface dialog, int whichButton) {
    }
  })
  .show();
Я нашел его чище и более многоразовым, чтобы расширить
AlertDialog.Builderдля создания пользовательского диалогового класса. Это для диалогового окна, которое просит пользователя ввести номер телефона. Предустановленный номер телефона также может быть предоставлен по телефонуsetNumber()перед вызовомshow().InputSenderDialog.java
public class InputSenderDialog extends AlertDialog.Builder {

    public interface InputSenderDialogListener{
        public abstract void onOK(String number);
        public abstract void onCancel(String number);
    }

    private EditText mNumberEdit;

    public InputSenderDialog(Activity activity, final InputSenderDialogListener listener) {
        super( new ContextThemeWrapper(activity, R.style.AppTheme) );

        @SuppressLint("InflateParams") // It's OK to use NULL in an AlertDialog it seems...
        View dialogLayout = LayoutInflater.from(activity).inflate(R.layout.dialog_input_sender_number, null);
        setView(dialogLayout);

        mNumberEdit = dialogLayout.findViewById(R.id.numberEdit);

        setPositiveButton("OK", new DialogInterface.OnClickListener() {
            @Override
            public void onClick(DialogInterface dialog, int id) {
                if( listener != null )
                    listener.onOK(String.valueOf(mNumberEdit.getText()));

            }
        });

        setNegativeButton("Cancel", new DialogInterface.OnClickListener() {
            @Override
            public void onClick(DialogInterface dialog, int id) {
                if( listener != null )
                    listener.onCancel(String.valueOf(mNumberEdit.getText()));
            }
        });
    }

    public InputSenderDialog setNumber(String number){
        mNumberEdit.setText( number );
        return this;
    }

    @Override
    public AlertDialog show() {
        AlertDialog dialog = super.show();
        Window window = dialog.getWindow();
        if( window != null )
            window.setSoftInputMode(WindowManager.LayoutParams.SOFT_INPUT_STATE_ALWAYS_VISIBLE);
        return dialog;
    }
}
dialog_input_sender_number.xml
<?xml version="1.0" encoding="utf-8"?>
<android.support.constraint.ConstraintLayout xmlns:android="http://schemas.android.com/apk/res/android"
    android:layout_width="match_parent"
    android:layout_height="match_parent"
    xmlns:app="http://schemas.android.com/apk/res-auto"
    android:padding="10dp">

    <TextView
        android:id="@+id/title"
        android:layout_width="wrap_content"
        android:layout_height="wrap_content"
        app:layout_constraintTop_toTopOf="parent"
        app:layout_constraintLeft_toLeftOf="parent"
        android:paddingBottom="20dp"
        android:text="Input phone number"
        android:textAppearance="@style/TextAppearance.AppCompat.Large" />

    <TextView
        android:id="@+id/numberLabel"
        android:layout_width="wrap_content"
        android:layout_height="wrap_content"
        app:layout_constraintTop_toBottomOf="@+id/title"
        app:layout_constraintLeft_toLeftOf="parent"
        android:text="Phone number" />

    <EditText
        android:id="@+id/numberEdit"
        android:layout_width="match_parent"
        android:layout_height="wrap_content"
        app:layout_constraintTop_toBottomOf="@+id/numberLabel"
        app:layout_constraintLeft_toLeftOf="parent"
        android:inputType="phone" >
        <requestFocus />
    </EditText>

</android.support.constraint.ConstraintLayout>
использование:
new InputSenderDialog(getActivity(), new InputSenderDialog.InputSenderDialogListener() {
    @Override
    public void onOK(final String number) {
        Log.d(TAG, "The user tapped OK, number is "+number);
    }

    @Override
    public void onCancel(String number) {
        Log.d(TAG, "The user tapped Cancel, number is "+number);
    }
}).setNumber(someNumberVariable).show();
Comments