UIActionSheet iOS Swift
Как сделать UIActionSheet в iOS Swift?
Вот мой код для кодирования UIActionSheet.
@IBAction func downloadSheet(sender: AnyObject)

{

    let optionMenu = UIAlertController(title: nil, message: "Choose Option", preferredStyle: .ActionSheet)


    let saveAction = UIAlertAction(title: "Save", style: .Default, handler:

    {

        (alert: UIAlertAction!) -> Void in

        println("Saved")

    })


    let deleteAction = UIAlertAction(title: "Delete", style: .Default, handler:

    {

        (alert: UIAlertAction!) -> Void in

        println("Deleted")

    })


    let cancelAction = UIAlertAction(title: "Cancel", style: .Cancel, handler:

    {

        (alert: UIAlertAction!) -> Void in

        println("Cancelled")

    })

    optionMenu.addAction(deleteAction)

    optionMenu.addAction(saveAction)

    optionMenu.addAction(cancelAction)

    self.presentViewController(optionMenu, animated: true, completion: nil)

}
Я надеюсь, что мой код-это понятно...
Я приветствую лучшее предложение для этого кода.
12 ответов:
ваш подход в порядке, но вы можете добавить
UIActionSheetС другим способом с легкостью.вы можете добавить
UIActionSheetDelegateв UIViewController ' likeclass ViewController: UIViewController ,UIActionSheetDelegateустановить вам метод, как,
@IBAction func downloadSheet(sender: AnyObject)
{

    let actionSheet = UIActionSheet(title: "Choose Option", delegate: self, cancelButtonTitle: "Cancel", destructiveButtonTitle: nil, otherButtonTitles: "Save", "Delete")

    actionSheet.showInView(self.view)
}
вы можете получить индекс кнопки, когда он щелкнул, как
func actionSheet(actionSheet: UIActionSheet, clickedButtonAtIndex buttonIndex: Int)
{
    println("\(buttonIndex)")
    switch (buttonIndex){

    case 0:
        println("Cancel")
    case 1:
        println("Save")
    case 2:
        println("Delete")
    default:
        println("Default")
        //Some code here..

    }
}
обновление 1: для iOS8+
    //Create the AlertController and add Its action like button in Actionsheet
    let actionSheetControllerIOS8: UIAlertController = UIAlertController(title: "Please select", message: "Option to select", preferredStyle: .ActionSheet)

    let cancelActionButton = UIAlertAction(title: "Cancel", style: .cancel) { _ in
        print("Cancel")
    }
    actionSheetControllerIOS8.addAction(cancelActionButton)

    let saveActionButton = UIAlertAction(title: "Save", style: .default)
        { _ in
           print("Save")
    }
    actionSheetControllerIOS8.addAction(saveActionButton)

    let deleteActionButton = UIAlertAction(title: "Delete", style: .default)
        { _ in
            print("Delete")
    }
    actionSheetControllerIOS8.addAction(deleteActionButton)
    self.present(actionSheetControllerIOS8, animated: true, completion: nil)
обновлено для Swift 4
работает для iOS 11
некоторые из других ответов в порядке, но я закончил смешивать и сопоставлять некоторые из них, чтобы скорее придумать это:
@IBAction func showAlert(sender: AnyObject) {
    let alert = UIAlertController(title: "Title", message: "Please Select an Option", preferredStyle: .actionSheet)

    alert.addAction(UIAlertAction(title: "Approve", style: .default , handler:{ (UIAlertAction)in
        print("User click Approve button")
    }))

    alert.addAction(UIAlertAction(title: "Edit", style: .default , handler:{ (UIAlertAction)in
        print("User click Edit button")
    }))

    alert.addAction(UIAlertAction(title: "Delete", style: .destructive , handler:{ (UIAlertAction)in
        print("User click Delete button")
    }))

    alert.addAction(UIAlertAction(title: "Dismiss", style: .cancel, handler:{ (UIAlertAction)in
        print("User click Dismiss button")
    }))

    self.present(alert, animated: true, completion: {
        print("completion block")
    })
}
наслаждайтесь :)
UIActionSheetявляется устаревшим в iOS 8.Я использую следующие:
// Create the AlertController
let actionSheetController = UIAlertController(title: "Please select", message: "How you would like to utilize the app?", preferredStyle: .ActionSheet)

// Create and add the Cancel action
let cancelAction = UIAlertAction(title: "Cancel", style: .Cancel) { action -> Void in
    // Just dismiss the action sheet
}
actionSheetController.addAction(cancelAction)

// Create and add first option action
let takePictureAction = UIAlertAction(title: "Consumer", style: .Default) { action -> Void in
    self.performSegueWithIdentifier("segue_setup_customer", sender: self)
}
actionSheetController.addAction(takePictureAction)

// Create and add a second option action
let choosePictureAction = UIAlertAction(title: "Service provider", style: .Default) { action -> Void in
    self.performSegueWithIdentifier("segue_setup_provider", sender: self)
}
actionSheetController.addAction(choosePictureAction)

// We need to provide a popover sourceView when using it on iPad
actionSheetController.popoverPresentationController?.sourceView = sender as UIView

// Present the AlertController
self.presentViewController(actionSheetController, animated: true, completion: nil)
обновление для Swift 3:
// Create the AlertController and add its actions like button in ActionSheet
let actionSheetController = UIAlertController(title: "Please select", message: "Option to select", preferredStyle: .actionSheet)

let cancelActionButton = UIAlertAction(title: "Cancel", style: .cancel) { action -> Void in
    print("Cancel")
}
actionSheetController.addAction(cancelActionButton)

let saveActionButton = UIAlertAction(title: "Save", style: .default) { action -> Void in
    print("Save")
}
actionSheetController.addAction(saveActionButton)

let deleteActionButton = UIAlertAction(title: "Delete", style: .default) { action -> Void in
    print("Delete")
}
actionSheetController.addAction(deleteActionButton)
self.present(actionSheetController, animated: true, completion: nil)
обновлено для Swift 3
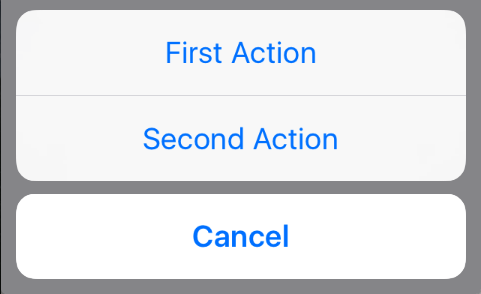
    // create an actionSheet
    let actionSheetController: UIAlertController = UIAlertController(title: nil, message: nil, preferredStyle: .actionSheet)

    // create an action
    let firstAction: UIAlertAction = UIAlertAction(title: "First Action", style: .default) { action -> Void in

        print("First Action pressed")
    }

    let secondAction: UIAlertAction = UIAlertAction(title: "Second Action", style: .default) { action -> Void in

        print("Second Action pressed")
    }

    let cancelAction: UIAlertAction = UIAlertAction(title: "Cancel", style: .cancel) { action -> Void in }

    // add actions
    actionSheetController.addAction(firstAction)
    actionSheetController.addAction(secondAction)
    actionSheetController.addAction(cancelAction)

    // present an actionSheet...
    present(actionSheetController, animated: true, completion: nil)
Generetic Action Sheet работает для Swift 4 и 4.2
Если вам нравится общая версия, которую вы можете вызвать из каждого
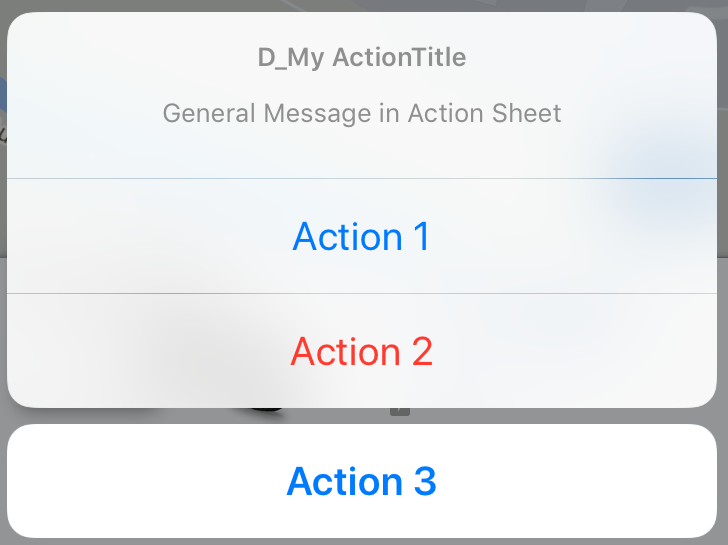
ViewControllerи в каждом проекте, попробуйте вот этот:class Alerts { static func showActionsheet(viewController: UIViewController, title: String, message: String, actions: [(String, UIAlertActionStyle)], completion: @escaping (_ index: Int) -> Void) { let alertViewController = UIAlertController(title: title, message: message, preferredStyle: .actionSheet) for (index, (title, style)) in actions.enumerated() { let alertAction = UIAlertAction(title: title, style: style) { (_) in completion(index) } alertViewController.addAction(alertAction) } viewController.present(alertViewController, animated: true, completion: nil) } }вызов, как это в вашем ViewController.
    var actions: [(String, UIAlertActionStyle)] = []
    actions.append(("Action 1", UIAlertActionStyle.default))
    actions.append(("Action 2", UIAlertActionStyle.destructive))
    actions.append(("Action 3", UIAlertActionStyle.cancel))

    //self = ViewController
    Alerts.showActionsheet(viewController: self, title: "D_My ActionTitle", message: "General Message in Action Sheet", actions: actions) { (index) in
        print("call action \(index)")
        /*
         results
         call action 0
         call action 1
         call action 2
         */
    }
внимание: может быть, вам интересно, почему я добавляю
Action 1/2/3но есть результаты как 0,1,2. В строюfor (index, (title, style)) in actions.enumerated()Я получаю индекс действия. Массивов всегда начинаются с индексом 0. Поэтому завершение 0,1,2.если вы хотите установить перечисление, идентификатор или другой идентификатор, я бы рекомендовал передать объект в параметре
actions.
Старый Способ: UIActionSheet
let actionSheet = UIActionSheet(title: "Takes the appearance of the bottom bar if specified; otherwise, same as UIActionSheetStyleDefault.", delegate: self, cancelButtonTitle: "Cancel", destructiveButtonTitle: "Destroy", otherButtonTitles: "OK")
actionSheet.actionSheetStyle = .Default
actionSheet.showInView(self.view)

// MARK: UIActionSheetDelegate

func actionSheet(actionSheet: UIActionSheet, clickedButtonAtIndex  buttonIndex: Int) {
switch buttonIndex {
    ...
   }
}
Новый Способ: UIAlertController
let alertController = UIAlertController(title: nil, message: "Takes the appearance of the bottom bar if specified; otherwise, same as UIActionSheetStyleDefault.", preferredStyle: .ActionSheet)

let cancelAction = UIAlertAction(title: "Cancel", style: .Cancel) { (action) in
  // ...
 }
 alertController.addAction(cancelAction)

let OKAction = UIAlertAction(title: "OK", style: .Default) { (action) in
   // ...
}
alertController.addAction(OKAction)

let destroyAction = UIAlertAction(title: "Destroy", style: .Destructive) { (action) in
println(action)
}
alertController.addAction(destroyAction)

self.presentViewController(alertController, animated: true) {
// ...
}
Swift:
приведенный ниже пример кода работает как на iPhone, так и на iPad.
 guard let viewRect = sender as? UIView else {
                return
            }

        let cameraSettingsAlert = UIAlertController(title: NSLocalizedString("Please choose a course", comment: ""), message: NSLocalizedString("", comment: ""), preferredStyle: .ActionSheet)
        cameraSettingsAlert.modalPresentationStyle = .Popover

        let photoResolutionAction = UIAlertAction(title: NSLocalizedString("Photo Resolution", comment: ""), style: .Default) { action in

        }
        let cameraOrientationAction = UIAlertAction(title: NSLocalizedString("Camera Orientation", comment: ""), style: .Default) { action in

        }
        let flashModeAction = UIAlertAction(title: NSLocalizedString("Flash Mode", comment: ""), style: .Default) { action in

        }
        let timeStampOnPhotoAction = UIAlertAction(title: NSLocalizedString("Time Stamp on Photo", comment: ""), style: .Default) { action in

        }
        let cancel = UIAlertAction(title: NSLocalizedString("Cancel", comment: ""), style: .Cancel) { action in

        }
        cameraSettingsAlert.addAction(cancel)
        cameraSettingsAlert.addAction(cameraOrientationAction)
        cameraSettingsAlert.addAction(flashModeAction)
        cameraSettingsAlert.addAction(timeStampOnPhotoAction)
        cameraSettingsAlert.addAction(photoResolutionAction)

        if let presenter = cameraSettingsAlert.popoverPresentationController {
            presenter.sourceView = viewRect;
            presenter.sourceRect = viewRect.bounds;
        }
        presentViewController(cameraSettingsAlert, animated: true, completion: nil)
лист действий в iOS10 с Swift3.0. Перейдите по этой ссылке.
 @IBAction func ShowActionSheet(_ sender: UIButton) {
    // Create An UIAlertController with Action Sheet

    let optionMenuController = UIAlertController(title: nil, message: "Choose Option from Action Sheet", preferredStyle: .actionSheet)

    // Create UIAlertAction for UIAlertController

    let addAction = UIAlertAction(title: "Add", style: .default, handler: {
        (alert: UIAlertAction!) -> Void in
        print("File has been Add")
    })
    let saveAction = UIAlertAction(title: "Edit", style: .default, handler: {
        (alert: UIAlertAction!) -> Void in
        print("File has been Edit")
    })

    let deleteAction = UIAlertAction(title: "Delete", style: .default, handler: {
        (alert: UIAlertAction!) -> Void in
        print("File has been Delete")
    })
    let cancelAction = UIAlertAction(title: "Cancel", style: .cancel, handler: {
        (alert: UIAlertAction!) -> Void in
        print("Cancel")
    })

    // Add UIAlertAction in UIAlertController

    optionMenuController.addAction(addAction)
    optionMenuController.addAction(saveAction)
    optionMenuController.addAction(deleteAction)
    optionMenuController.addAction(cancelAction)

    // Present UIAlertController with Action Sheet

    self.present(optionMenuController, animated: true, completion: nil)

}
http://www.problemstucks.com/Action-Sheet-with-Swift3.0.html
swift4 (проверено)
let alertController = UIAlertController(title: "Select Photo", message: "Select atleast one photo", preferredStyle: .actionSheet)
    let action1 = UIAlertAction(title: "From Photo", style: .default) { (action) in
        print("Default is pressed.....")
    }
    let action2 = UIAlertAction(title: "Cancel", style: .cancel) { (action) in
        print("Cancel is pressed......")
    }
    let action3 = UIAlertAction(title: "Click new", style: .default) { (action) in
        print("Destructive is pressed....")

    }
    alertController.addAction(action1)
    alertController.addAction(action2)
    alertController.addAction(action3)
    self.present(alertController, animated: true, completion: nil)

}
Swift 3 Для отображения UIAlertController из UIBarButtonItem на iPad
        let alert = UIAlertController(title: "Title", message: "Please Select an Option", preferredStyle: .actionSheet)

    alert.addAction(UIAlertAction(title: "Approve", style: .default , handler:{ (UIAlertAction)in
        print("User click Approve button")
    }))

    alert.addAction(UIAlertAction(title: "Edit", style: .default , handler:{ (UIAlertAction)in
        print("User click Edit button")
    }))

    alert.addAction(UIAlertAction(title: "Delete", style: .destructive , handler:{ (UIAlertAction)in
        print("User click Delete button")
    }))

    alert.addAction(UIAlertAction(title: "Dismiss", style: UIAlertActionStyle.cancel, handler:{ (UIAlertAction)in
        print("User click Dismiss button")
    }))

    if let presenter = alert.popoverPresentationController {
        presenter.barButtonItem = sender
    }

    self.present(alert, animated: true, completion: {
        print("completion block")
    })
вы можете использовать следующий код для open actionSheet в Swift
        let alert = UIAlertController(title: enter your title, message: "Enter your messgage. ", preferredStyle: UIAlertControllerStyle.Alert)

        alert.addTextFieldWithConfigurationHandler(configurationTextField)

        alert.addAction(UIAlertAction(title: "Close", style: UIAlertActionStyle.Cancel, handler:{ (UIAlertAction)in
            print("User click Cancel button")
        }))

        alert.addAction(UIAlertAction(title: "Ok", style: UIAlertActionStyle.Default, handler:{ (UIAlertAction)in
            print("User click Ok button")


        }))
        self.presentViewController(alert, animated: true, completion: {
            print("completion block")
        })
Comments