UITableView ячейки выбранного цвета?
Я создал обычай UITableViewCell. Табличное представление прекрасно отображает данные. То, что я застрял в том, когда пользователь касается ячейки tableview, то я хочу показать цвет фона ячейки, отличный от значений по умолчанию [синий цвет] для выделения выделенной ячейки.
Я использую этот код, но ничего не происходит:
cell.selectedBackgroundView.backgroundColor=[UIColor blackColor];
30 ответов:
Я думаю, что вы были на правильном пути, но в соответствии с определением класса для
selectedBackgroundView:Таким образом, если вы используете таблицу простого стиля, то вам нужно выделить новыйЗначение по умолчанию равно nil для ячеек в таблицах простого стиля (UITableViewStylePlain) и не равно nil для таблиц групп разделов (UITableViewStyleGrouped).
UIView, имеющий желаемый цвет фона, а затем назначить егоselectedBackgroundView.В качестве альтернативы можно использовать:
cell.selectionStyle = UITableViewCellSelectionStyleGray;Если все вы желаемым был серый фон при выделении ячейки. Надеюсь, это поможет.
Нет необходимости в пользовательских ячейках. Если вы хотите изменить только выбранный цвет ячейки, вы можете сделать следующее:
Цель-С:
UIView *bgColorView = [[UIView alloc] init];
bgColorView.backgroundColor = [UIColor redColor];
[cell setSelectedBackgroundView:bgColorView];
Свифт:
let bgColorView = UIView()
bgColorView.backgroundColor = UIColor.redColor()
cell.selectedBackgroundView = bgColorView
Swift 3:
let bgColorView = UIView()
bgColorView.backgroundColor = UIColor.red
cell.selectedBackgroundView = bgColorView
Edit: обновлено для ARC
Правка: Добавляет Swift 3
Если у вас есть сгруппированная таблица только с одной ячейкой на секцию, просто добавьте эту дополнительную строку в код:
bgColorView.layer.cornerRadius = 10;UIView *bgColorView = [[UIView alloc] init]; [bgColorView setBackgroundColor:[UIColor redColor]]; bgColorView.layer.cornerRadius = 10; [cell setSelectedBackgroundView:bgColorView]; [bgColorView release];Не забудьте импортировать QuartzCore.
Swift 3: для меня это сработало, когда вы поместили его в метод
cellForRowAtIndexPath:let view = UIView() view.backgroundColor = UIColor.red cell.selectedBackgroundView = view
Следующее работает для меня в iOS 8.
Я должен установить стиль выделения в
UITableViewCellSelectionStyleDefault, чтобы пользовательский цвет фона работал. Если какой-либо другой стиль, пользовательский цвет фона будет проигнорирован. По-видимому, происходит изменение в поведении, поскольку предыдущие ответы должны устанавливать стиль "нет".Полный код ячейки выглядит следующим образом:
- (UITableViewCell *)tableView:(UITableView *)tableView cellForRowAtIndexPath:(NSIndexPath *)indexPath {
    static NSString *CellIdentifier = @"MyCell";
    UITableViewCell *cell = [tableView dequeueReusableCellWithIdentifier:CellIdentifier];
    if (cell == nil) {
        cell = [[UITableViewCell alloc] initWithStyle:UITableViewCellStyleDefault reuseIdentifier:CellIdentifier];
    }

    // This is how you change the background color
    cell.selectionStyle = UITableViewCellSelectionStyleDefault;
    UIView *bgColorView = [[UIView alloc] init];
    bgColorView.backgroundColor = [UIColor redColor];
    [cell setSelectedBackgroundView:bgColorView];
    return cell;
}
Создайте пользовательскую ячейку для ячейки таблицы и в классе пользовательская ячейка.m поместите код ниже, он будет работать нормально. Вам нужно поместить желаемое цветное изображение в
selectionBackgroundUIImage.- (void)setSelected:(BOOL)selected animated:(BOOL)animated { UIImage *selectionBackground = [UIImage imageNamed:@"yellow_bar.png"]; UIImageView *iview=[[UIImageView alloc] initWithImage:selectionBackground]; self.selectedBackgroundView=iview; }
-(void)tableView:(UITableView *)tableView willDisplayCell:(UITableViewCell *)cell forRowAtIndexPath:(NSIndexPath *)indexPath
{
    UIView *view = [[UIView alloc] init];
    [view setBackgroundColor:[UIColor redColor]];
    [cell setSelectedBackgroundView:view];
}
В этом методе нам нужно задать выбранный вид фона.
Если вы хотите добавить пользовательский выделенный цвет в свою ячейку (и ваша ячейка содержит кнопки, метки, изображения и т. д..) Я сделал следующие шаги:
Например, если вы хотите выбрать желтый цвет:
1) Создайте представление, которое соответствует всей ячейке с 20% непрозрачностью (с желтым цветом), называемой, например, backgroundselectedView
2) в контроллере ячейки запишите следующее:
- (void)touchesBegan:(NSSet *)touches withEvent:(UIEvent *)event
{
     self.backgroundselectedView.alpha=1;
    [super touchesBegan:touches withEvent:event];
}

- (void)touchesEnded:(NSSet *)touches withEvent:(UIEvent *)event
{
    self.backgroundselectedView.alpha=0;
    [super touchesEnded:touches withEvent:event];
}

- (void)touchesCancelled:(NSSet *)touches withEvent:(UIEvent *)event
{
    self.backgroundSelectedImage.alpha=0;
    [super touchesCancelled:touches withEvent:event];
}
Если вы используете пользовательский элемент TableViewCell, вы также можете переопределить
awakeFromNib:override func awakeFromNib() { super.awakeFromNib() // Set background color let view = UIView() view.backgroundColor = UIColor.redColor() selectedBackgroundView = view }
Расширение Swift 3.0
extension UITableViewCell {
    var selectionColor: UIColor {
        set {
            let view = UIView()
            view.backgroundColor = newValue
            self.selectedBackgroundView = view
        }
        get {
            return self.selectedBackgroundView?.backgroundColor ?? UIColor.clear
        }
    }
}
cell.selectionColor = UIColor.FormaCar.blue
Еще один совет к способу Кристиана показать закругленный угловой фон для сгруппированной таблицы.
Если я использую
cornerRadius = 10для ячейки, он показывает закругленный фон выделения четырех углов. Это не то же самое с пользовательским интерфейсом представления таблиц по умолчанию.Итак, я думаю о простом способе решить его с помощью cornerRadius. Как вы можете видеть из приведенных ниже кодов, проверьте местоположение ячейки (верхний, нижний, средний или верхний) и добавьте еще один подслоек, чтобы скрыть верхний или нижний угол. Это просто показывает точно то же самое выглядит с фоном выбора представления таблицы по умолчанию.
Я протестировал этот код на iPad
Пожалуйста, дайте мне знать, если есть более простой способ достичь того же результата.splitterview. Вы можете изменить положение рамки patchLayer по мере необходимости.if (tableView.style == UITableViewStyleGrouped) { if (indexPath.row == 0) { cellPosition = CellGroupPositionAtTop; } else { cellPosition = CellGroupPositionAtMiddle; } NSInteger numberOfRows = [tableView numberOfRowsInSection:indexPath.section]; if (indexPath.row == numberOfRows - 1) { if (cellPosition == CellGroupPositionAtTop) { cellPosition = CellGroupPositionAtTopAndBottom; } else { cellPosition = CellGroupPositionAtBottom; } } if (cellPosition != CellGroupPositionAtMiddle) { bgColorView.layer.cornerRadius = 10; CALayer *patchLayer; if (cellPosition == CellGroupPositionAtTop) { patchLayer = [CALayer layer]; patchLayer.frame = CGRectMake(0, 10, 302, 35); patchLayer.backgroundColor = YOUR_BACKGROUND_COLOR; [bgColorView.layer addSublayer:patchLayer]; } else if (cellPosition == CellGroupPositionAtBottom) { patchLayer = [CALayer layer]; patchLayer.frame = CGRectMake(0, 0, 302, 35); patchLayer.backgroundColor = YOUR_BACKGROUND_COLOR; [bgColorView.layer addSublayer:patchLayer]; } } }
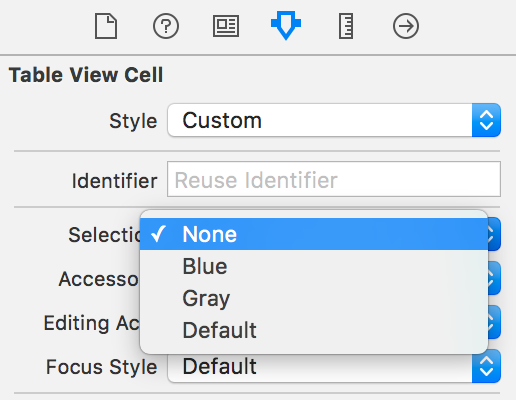
Хочу отметить, что редактор XIB предлагает вам следующие стандартные опции:
Секция: синий / серый / нет
(правый столбец с опциями, 4-я вкладка, первая группа "ячейка представления таблицы", 4-я подгруппа, 1-й из 3 пунктов читает "выбор")
Вероятно, то, что вы хотите сделать, может быть достигнуто путем выбора правильного стандартного варианта.
Согласно пользовательскому цвету для выбранной ячейки в
UITableView, Отличное решение согласно ответу Мацея СвикаПросто чтобы добавить к этому, вы объявляете ответ Swic в конфигурации ячейки обычно под:
- (UITableViewCell *)tableView:(UITableView *)tableView cellForRowAtIndexPath:(NSIndexPath *)indexPathИ для дополнительного эффекта вместо системных цветов вы можете использовать значения RGB для пользовательского цветового оформления. В моем коде это то, как я достиг этого:
Дайте мне знать, если это сработает и для вас. Вы можете возиться с номером- (UITableViewCell *)tableView:(UITableView *)tableView cellForRowAtIndexPath:(NSIndexPath *)indexPath } static NSString *CellIdentifier = @"YourCustomCellName"; MakanTableCell *cell = [self.tableView dequeueReusableCellWithIdentifier:CellIdentifier forIndexPath:indexPath]; // Configure the cell... if (cell == nil) { cell = [[[NSBundle mainBundle]loadNibNamed:@"YourCustomCellClassName" owner:self options:nil]objectAtIndex:0]; } UIView *bgColorView = [[UIView alloc] init]; bgColorView.backgroundColor = [UIColor colorWithRed:255.0/256.0 green:239.0/256.0 blue:49.0/256.0 alpha:1]; bgColorView.layer.cornerRadius = 7; bgColorView.layer.masksToBounds = YES; [cell setSelectedBackgroundView:bgColorView]; return cell; }cornerRadiusдля воздействие на углы выбранной ячейки.
У меня немного другой подход, чем у всех остальных, который отражает выбор на ощупь, а не После выбора. У меня есть подкласс UITableViewCell. Все, что вам нужно сделать, это установить цвет фона в событиях касания, которые имитируют выделение при касании, а затем установить цвет фона в функции setSelected. Установка цвета фона в функции selSelected позволяет отменить выделение ячейки. Обязательно передайте событие касания управляющему, в противном случае клетка на самом деле не будет действовать так, как если бы ее выбрали.
override func touchesBegan(touches: NSSet, withEvent event: UIEvent) {
    self.backgroundColor = UIColor(white: 0.0, alpha: 0.1)
    super.touchesBegan(touches, withEvent: event)
}

override func touchesCancelled(touches: NSSet!, withEvent event: UIEvent!) {
    self.backgroundColor = UIColor.clearColor()
    super.touchesCancelled(touches, withEvent: event)
}

override func setSelected(selected: Bool, animated: Bool) {
    super.setSelected(selected, animated: animated)

    // Configure the view for the selected state
    self.backgroundColor = selected ? UIColor(white: 0.0, alpha: 0.1) : UIColor.clearColor()
}
Чтобы добавить фон для всех ячеек (используя ответ Мацея):
for (int section = 0; section < [self.tableView numberOfSections]; section++) {
        for (int row = 0; row < [self.tableView numberOfRowsInSection:section]; row++) {
            NSIndexPath* cellPath = [NSIndexPath indexPathForRow:row inSection:section];
            UITableViewCell* cell = [self.tableView cellForRowAtIndexPath:cellPath];

            //stuff to do with each cell
            UIView *bgColorView = [[UIView alloc] init];
            bgColorView.backgroundColor = [UIColor redColor];
            [cell setSelectedBackgroundView:bgColorView];
        }
    }
Переопределить
UITableViewCell' ssetSelectedтакже работает.override func setSelected(selected: Bool, animated: Bool) { super.setSelected(selected, animated: animated) // Set background color let view = UIView() view.backgroundColor = UIColor.redColor() selectedBackgroundView = view }
Для тех, кто просто хочет избавиться от выбранного по умолчанию серого фона, поместите эту строку кода в свой cellforrowatindexpath func:
yourCell.selectionStyle = .None
Для Swift 3.0:
override func tableView(_ tableView: UITableView, didSelectRowAt indexPath: IndexPath) {
    let cell = super.tableView(tableView, cellForRowAt: indexPath)

    cell.contentView.backgroundColor = UIColor.red
}
В Swift 4 можно также задать цвет фона ячейки таблицы глобально (взято из здесь):
let backgroundColorView = UIView()
backgroundColorView.backgroundColor = UIColor.red
UITableViewCell.appearance().selectedBackgroundView = backgroundColorView
Вот важные части кода, необходимые для сгруппированной таблицы. При выборе любой из ячеек в разделе Первая строка меняет цвет. Без первоначальной установки cellselectionstyle в none происходит двойная перезагрузка, когда пользователь нажимает row0, где ячейка изменяется на bgColorView, затем исчезает и снова загружает bgColorView. Удачи и дайте мне знать, если есть более простой способ сделать это.
- (UITableViewCell *)tableView:(UITableView *)tableView cellForRowAtIndexPath:(NSIndexPath *)indexPath
{

    static NSString *CellIdentifier = @"Cell";

    UITableViewCell *cell = [tableView dequeueReusableCellWithIdentifier:CellIdentifier];
    if (cell == nil) {
        cell = [[UITableViewCell alloc] initWithStyle:UITableViewCellStyleDefault reuseIdentifier:CellIdentifier];
    }

    if ([indexPath row] == 0)
    {
        cell.selectionStyle = UITableViewCellSelectionStyleNone;

        UIView *bgColorView = [[UIView alloc] init];
        bgColorView.layer.cornerRadius = 7;
        bgColorView.layer.masksToBounds = YES;
        [bgColorView setBackgroundColor:[UIColor colorWithRed:.85 green:0 blue:0 alpha:1]];
        [cell setSelectedBackgroundView:bgColorView];

        UIColor *backColor = [UIColor colorWithRed:0 green:0 blue:1 alpha:1];
        cell.backgroundColor = backColor;
        UIColor *foreColor = [UIColor colorWithWhite:1 alpha:1];
        cell.textLabel.textColor = foreColor;

        cell.textLabel.text = @"row0";
    }
    else if ([indexPath row] == 1)
    {
        cell.selectionStyle = UITableViewCellSelectionStyleNone;

        UIColor *backColor = [UIColor colorWithRed:1 green:1 blue:1 alpha:1];
        cell.backgroundColor = backColor;
        UIColor *foreColor = [UIColor colorWithRed:0 green:0 blue:0 alpha:1];
        cell.textLabel.textColor = foreColor;

        cell.textLabel.text = @"row1";
    }
    else if ([indexPath row] == 2)
    {
        cell.selectionStyle = UITableViewCellSelectionStyleNone;

        UIColor *backColor = [UIColor colorWithRed:1 green:1 blue:1 alpha:1];
        cell.backgroundColor = backColor;
        UIColor *foreColor = [UIColor colorWithRed:0 green:0 blue:0 alpha:1];
        cell.textLabel.textColor = foreColor;

        cell.textLabel.text = @"row2";
    }
    return cell;
}

#pragma mark Table view delegate

- (void)tableView:(UITableView *)tableView didSelectRowAtIndexPath:(NSIndexPath *)indexPath
{
    NSIndexPath *path = [NSIndexPath indexPathForRow:0 inSection:[indexPath section]];
    UITableViewCell *cell = [tableView cellForRowAtIndexPath:path];
    [cell setSelectionStyle:UITableViewCellSelectionStyleBlue];

    [tableView selectRowAtIndexPath:path animated:YES scrollPosition:UITableViewScrollPositionNone];

}

- (void)tableView:(UITableView *)tableView didDeselectRowAtIndexPath:(NSIndexPath *)indexPath
{
    UITableViewCell *cell = [tvStat cellForRowAtIndexPath:indexPath];
    [cell setSelectionStyle:UITableViewCellSelectionStyleNone];
}

#pragma mark Table view Gestures

-(IBAction)singleTapFrom:(UIGestureRecognizer *)tapRecog
{

    CGPoint tapLoc = [tapRecog locationInView:tvStat];
    NSIndexPath *tapPath = [tvStat indexPathForRowAtPoint:tapLoc];

    NSIndexPath *seleRow = [tvStat indexPathForSelectedRow];
    if([seleRow section] != [tapPath section])
        [self tableView:tvStat didDeselectRowAtIndexPath:seleRow];
    else if (seleRow == nil )
        {}
    else if([seleRow section] == [tapPath section] || [seleRow length] != 0)
        return;

    if(!tapPath)
        [self.view endEditing:YES];

    [self tableView:tvStat didSelectRowAtIndexPath:tapPath];
}
Я использую подход ниже и прекрасно работает для меня,
class MyTableViewCell : UITableViewCell {

                var defaultStateColor:UIColor?
                var hitStateColor:UIColor?

                 override func awakeFromNib(){
                     super.awakeFromNib()
                     self.selectionStyle = .None
                 }

// if you are overriding init you should set selectionStyle = .None

                override func touchesBegan(touches: Set<UITouch>, withEvent event: UIEvent?) {
                    if let hitColor = hitStateColor {
                        self.contentView.backgroundColor = hitColor
                    }
                }

                override func touchesEnded(touches: Set<UITouch>, withEvent event: UIEvent?) {
                    if let defaultColor = defaultStateColor {
                        self.contentView.backgroundColor = defaultColor
                    }
                }

                override func touchesCancelled(touches: Set<UITouch>?, withEvent event: UIEvent?) {
                    if let defaultColor = defaultStateColor {
                        self.contentView.backgroundColor = defaultColor
                    }
                }
            }
В случае пользовательского класса ячеек. Просто переопределите:
- (void)setSelected:(BOOL)selected animated:(BOOL)animated {
    [super setSelected:selected animated:animated];

    // Configure the view for the selected state

    if (selected) {
        [self setBackgroundColor: CELL_SELECTED_BG_COLOR];
        [self.contentView setBackgroundColor: CELL_SELECTED_BG_COLOR];
    }else{
        [self setBackgroundColor: [UIColor clearColor]];
        [self.contentView setBackgroundColor: [UIColor clearColor]];
    }
}
Это легко, когда стиль представления таблицы прост, но в групповом стиле это небольшая проблема, я решаю ее с помощью:
CGFloat cellHeight = [self tableView:tableView heightForRowAtIndexPath:indexPath];
UIView *view = [[UIView alloc] initWithFrame:CGRectMake(0, 0, kGroupTableViewCellWidth+2, cellHeight)];
view.backgroundColor = kCommonHighlightedColor;
cell.selectedBackgroundView = view;
[view release];
UIRectCorner cornerFlag = 0;
CGSize radii = CGSizeMake(0, 0);
NSInteger theLastRow = --> (yourDataSourceArray.count - 1);
if (indexPath.row == 0) {
    cornerFlag = UIRectCornerTopLeft | UIRectCornerTopRight;
    radii = CGSizeMake(10, 10);
} else if (indexPath.row == theLastRow) {
    cornerFlag = UIRectCornerBottomLeft | UIRectCornerBottomRight;
    radii = CGSizeMake(10, 10);
}
UIBezierPath *maskPath = [UIBezierPath bezierPathWithRoundedRect:view.bounds byRoundingCorners:cornerFlag cornerRadii:radii];
CAShapeLayer *shapeLayer = [CAShapeLayer layer];
shapeLayer.path = maskPath.CGPath;
view.layer.mask = shapeLayer;
Отметил kGroupTableViewCellWidth, я определяю его как 300, это ширина ячейки группового представления таблицы в iPhone
[cell setSelectionStyle:UITableViewCellSelectionStyleGray];Убедитесь, что вы использовали указанную выше строку для использования эффекта выбора
override func setSelected(selected: Bool, animated: Bool) {
    // Configure the view for the selected state

    super.setSelected(selected, animated: animated)
    let selView = UIView()

    selView.backgroundColor = UIColor( red: 5/255, green: 159/255, blue:223/255, alpha: 1.0 )
    self.selectedBackgroundView = selView
}
Я использую iOS 9.3 и установка цвета через раскадровку или настройка
cell.selectionStyleне сработала для меня, но код ниже работал:UIView *customColorView = [[UIView alloc] init]; customColorView.backgroundColor = [UIColor colorWithRed:55 / 255.0 green:141 / 255.0 blue:211 / 255.0 alpha:1.0]; cell.selectedBackgroundView = customColorView; return cell;Я нашел это решение здесь.
Попробуйте выполнить следующий код.
- (UITableViewCell *)tableView:(UITableView *)tableView cellForRowAtIndexPath:(NSIndexPath *)indexPath {

    UITableViewCell *cell = [tableView dequeueReusableCellWithIdentifier:[cellIdArray objectAtIndex:indexPath.row] forIndexPath:indexPath];

    // Configure the cell...
    cell.backgroundView =
    [[UIImageView alloc] init] ;
    cell.selectedBackgroundView =[[UIImageView alloc] init];

    UIImage *rowBackground;
    UIImage *selectionBackground;


    rowBackground = [UIImage imageNamed:@"cellBackgroundDarkGrey.png"];
    selectionBackground = [UIImage imageNamed:@"selectedMenu.png"];

    ((UIImageView *)cell.backgroundView).image = rowBackground;
    ((UIImageView *)cell.selectedBackgroundView).image = selectionBackground;


    return cell;
}
/ / Swift Версия:
func tableView(_ tableView: UITableView, cellForRowAt indexPath: IndexPath) -> UITableViewCell {


        let cell = tableView.dequeueReusableCell(withIdentifier: "cell")! as UITableViewCell


        cell.selectedBackgroundView = UIImageView()
        cell.backgroundView=UIImageView()

        let selectedBackground : UIImageView = cell.selectedBackgroundView as! UIImageView
        selectedBackground.image = UIImage.init(named:"selected.png");

        let backGround : UIImageView = cell.backgroundView as! UIImageView
        backGround.image = UIImage.init(named:"defaultimage.png");

        return cell


    }
Свифт 4.x
Чтобы изменить цвет фона выделения на любой цвет, используйте расширение Swift
Создайте расширение ячейки UITableView, как показано ниже
extension UITableViewCell{

    func removeCellSelectionColour(){
        let clearView = UIView()
        clearView.backgroundColor = UIColor.clear
        UITableViewCell.appearance().selectedBackgroundView = clearView
    }

}
Затем вызовите removeCellSelectionColour() с экземпляром ячейки.
- (void)tableView:(UITableView *)tableView didSelectRowAtIndexPath:(NSIndexPath *)indexPath
{
    [tableView reloadData];
    UITableViewCell *cell=(UITableViewCell*)[tableView cellForRowAtIndexPath:indexPath];
    [cell setBackgroundColor:[UIColor orangeColor]];
}
Comments